")
Looking to transform your manicure game? You’ve landed in the right spot! Nail polish is no longer just a beauty staple; it’s a vibrant form of self-expression. From bold hues to intricate designs, colorful nail polish can make your fingertips the highlight of any outfit. Whether you’re a trendsetter or someone who likes to keep it classic, the colorful options available today are endless.
Join me as we explore 25 stunning nail polish ideas that are sure to inspire your next salon visit or DIY session. Spoiler alert: you won’t want to miss the jaw-dropping design in section #10!
Contents
- 1. Rainbow Ombré Delight
- 2. Neon Abstract Art
- 3. Floral Fantasy
- 4. Geometric Chic
- 5. Glitter Galore
- 6. Marble Effect
- 7. Matte and Shine Duo
- 8. Tropical Vibes
- 9. Colorful French Tips
- 10. Cosmic Galaxy
- 11. Color Block Madness
- 12. Confetti Fun
- 13. Metallic Magic
- 14. Watercolor Whimsy
- 15. Striped Perfection
- 16. Dazzling Dot Nails
- 17. Artistic Brush Strokes
- 18. Jewel Tones
- 19. Tie-Dye Nails
- 20. Glitter Gradient
- 21. Seasonal Flair
- 22. Ombre Glitter
- 23. Cute Critters
- 24. Layered Colors
- 25. Hexagon Hues
1. Rainbow Ombré Delight
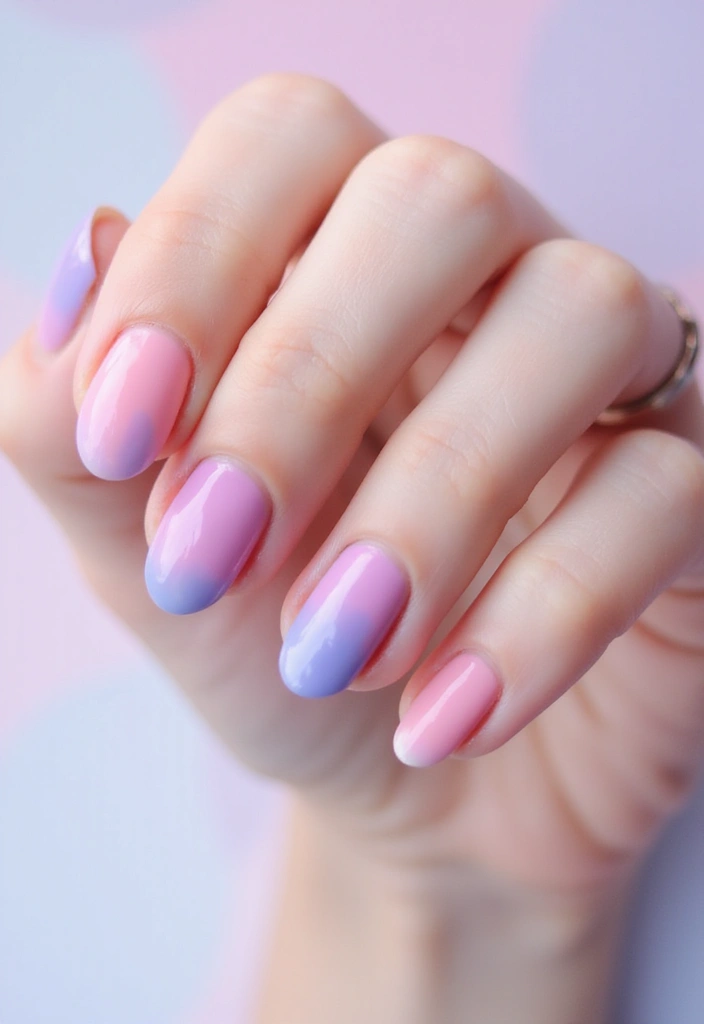
The ombré trend isn’t just for hair; it’s made its way to our nails in a dazzling rainbow effect! Imagine a color gradient from pink to purple, blue to green, and everything in between, blending flawlessly. This nail design is perfect for those who can’t pick just one color!
To achieve this look, start with a white base coat to make your colors pop. A great option for this is the Nail Polish Set – Rainbow Colors from Morovan, which offers a vibrant selection to choose from. Then, using a makeup sponge like the Makeup Sponge for Nail Art by MelodySusie, dab on your chosen colors sequentially from the tip to the cuticle. This sponge is perfect for achieving that smooth gradient effect!
Finish with a top coat to seal the deal and add shine. The Top Coat Nail Polish by Sally Hansen provides quick drying, long-lasting protection with a streak-free shine, ensuring your masterpiece stays flawless.
– Experiment with different color combinations, such as sunset hues for a warm vibe or neon shades for a fun twist.
– This design also gives you the freedom to mix and match shades for a personalized touch.
2. Neon Abstract Art
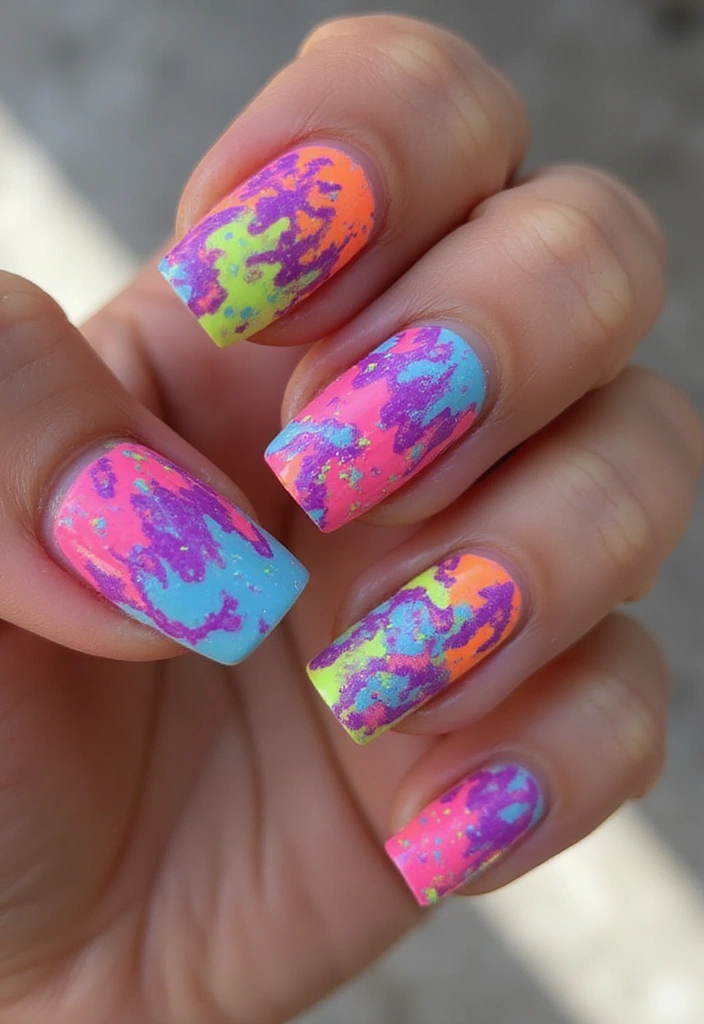
If you’re feeling particularly artsy, why not channel your inner Picasso with neon abstract nail art? This playful style uses bold, bright colors in spontaneous patterns that scream fun!
Start with a white or pastel base to allow those neon hues to shine. For the best results, grab a set of neon nail polish set, featuring vibrant colors like hot pink, orange, and yellow. These quick-dry polishes will make your manicure process smooth and efficient.
Use a thin brush or a dotting tool from a versatile nail art brush set to create random lines, dots, and shapes in various colors. This set includes everything you need, from striping liners to dotting tools, making it easier to express your creativity.
The beauty of this design is that it’s unique to you, as no two nails will look the same! For a bit more precision, consider using dotting tools for nail art. These tools are perfect for adding those intricate details that can elevate your design.
For success:
– Use contrasting colors for more impact. Think electric pinks with bright greens!
– Keep clean-up supplies handy, as it can get a bit messy. But that just adds to the fun!
3. Floral Fantasy
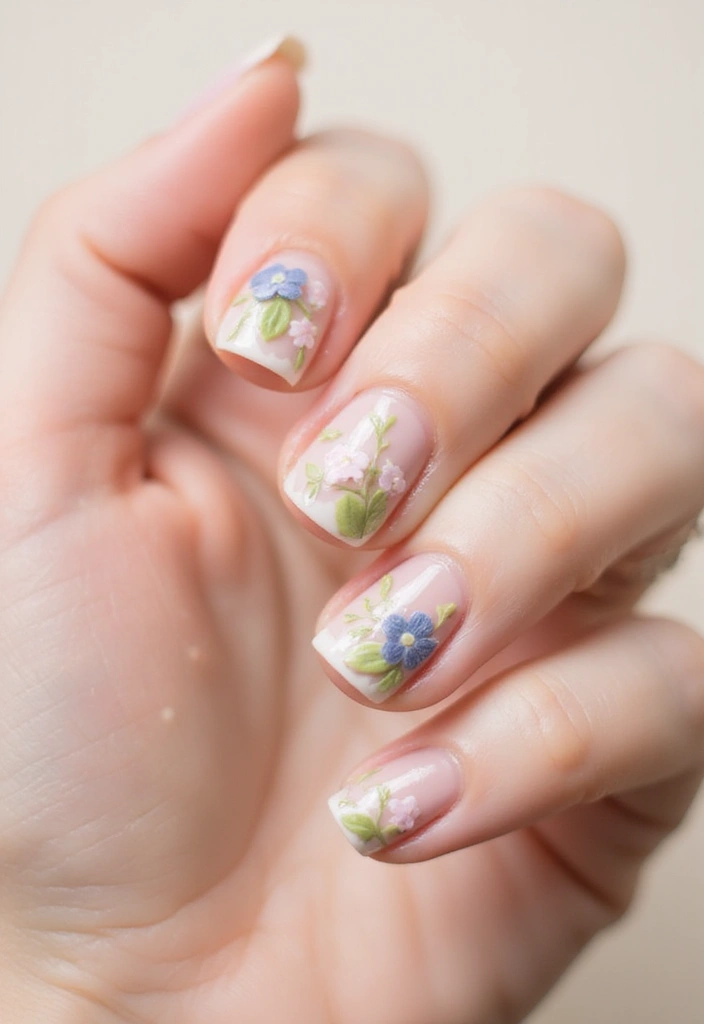
### 3. Floral Fantasy
Bring life to your nails with delightful floral designs. Whether you choose delicate daisies or bold roses, floral nail art is timeless and always on-trend. Start with a soft base color, such as pastel pink or lavender, using the pastel nail polish set for the perfect shades to set the scene.
Once your base is dry, use a nail art brush like the nail art brush set to paint your flowers. This set includes a variety of brushes designed to help you create stunning floral details, making it easier to express your creativity. Adding subtle green leaves can elevate the design even more; nature is beautiful in its imperfections, so don’t stress about perfection!
If you’re pressed for time or prefer a simpler approach, consider using floral nail stickers for an effortless yet charming design. These self-adhesive decals can quickly transform your manicure without the need for intricate painting.
Pair your floral nails with spring outfits, or use darker colors for a dramatic autumn vibe, and you’ll have a manicure that beautifully complements the season!
4. Geometric Chic
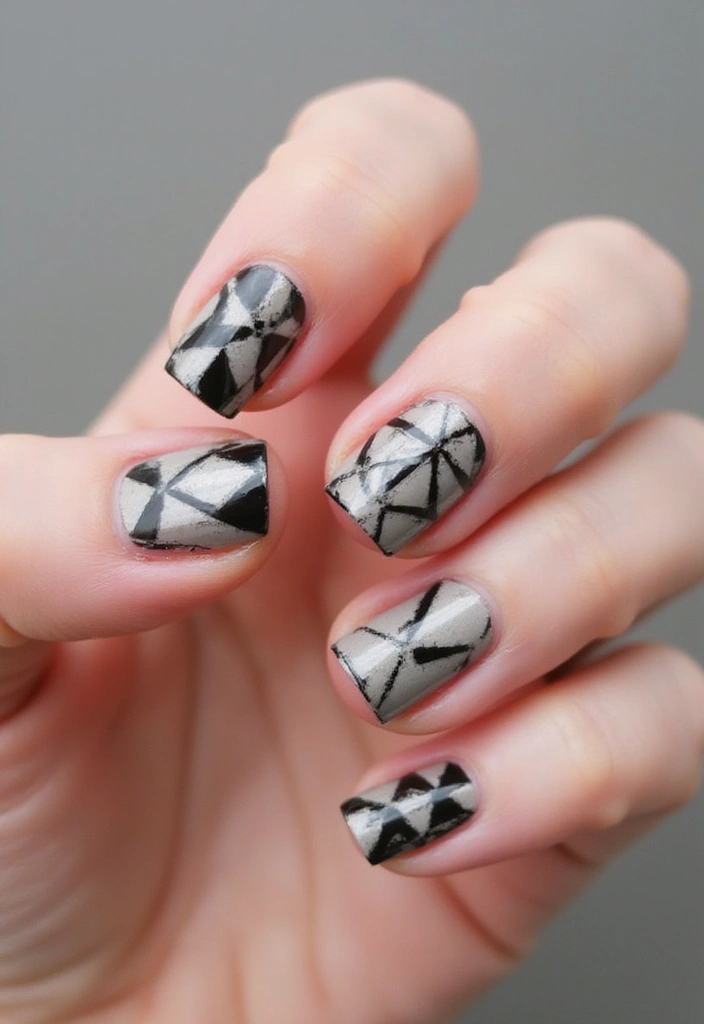
Geometric patterns are a sophisticated way to sport colorful nails. With clean lines and shapes, this design looks classy and modern.
Begin with a bold base color like royal blue or deep red. Once dry, use some nail art tape to create triangles, squares, or stripes; the tape will help you achieve those crisp lines when you paint over with contrasting colors. Carefully peel off the tape to reveal your stunning design.
For a finishing touch, consider using the matte and glossy top coat set. Mixing matte and glossy finishes adds depth and dimension to your geometric look, elevating your manicure to a whole new level.
Unique considerations:
– Experiment with color blocking by using only two colors for a striking look.
5. Glitter Galore
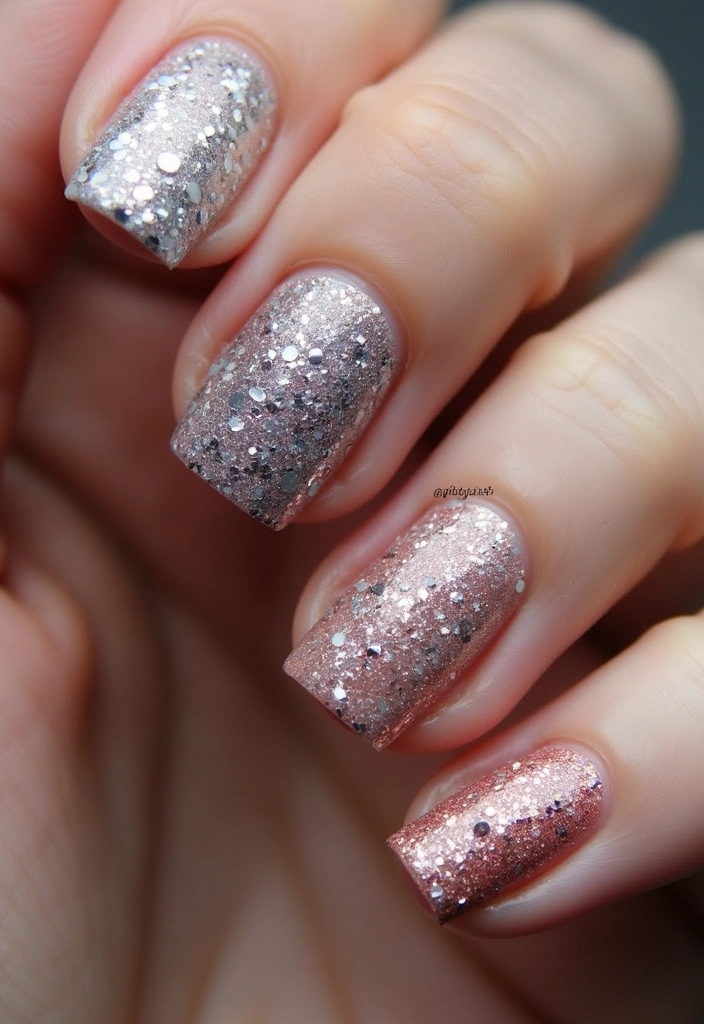
Who doesn’t love a touch of glitter? Sparkly nails can instantly elevate any look, making them perfect for parties or a night out.
For a simple yet stunning design, start with a solid base using a nude polish like Insta-Dri® taupe priority, quick dry, long lasting, streak-free shine, nude nail polish to create a subtle backdrop. Then, layer on glitter at the tips for a chic effect. If you’re looking for something more dramatic, cover the entire nail with a glitter polish such as Born Pretty holographic nail polish silver glitter sequins. The key to keeping your look polished and intact is to finish with a top coat like Sally Hansen double duty™, base and top coat. This will ensure everything stays smooth and vibrant.
Helpful tips:
– Try color-changing glitter that shimmers differently based on light angles for a fun twist.
– For a more understated look, use glitter polish over a nude base to add some sparkle without overwhelming colors.
6. Marble Effect
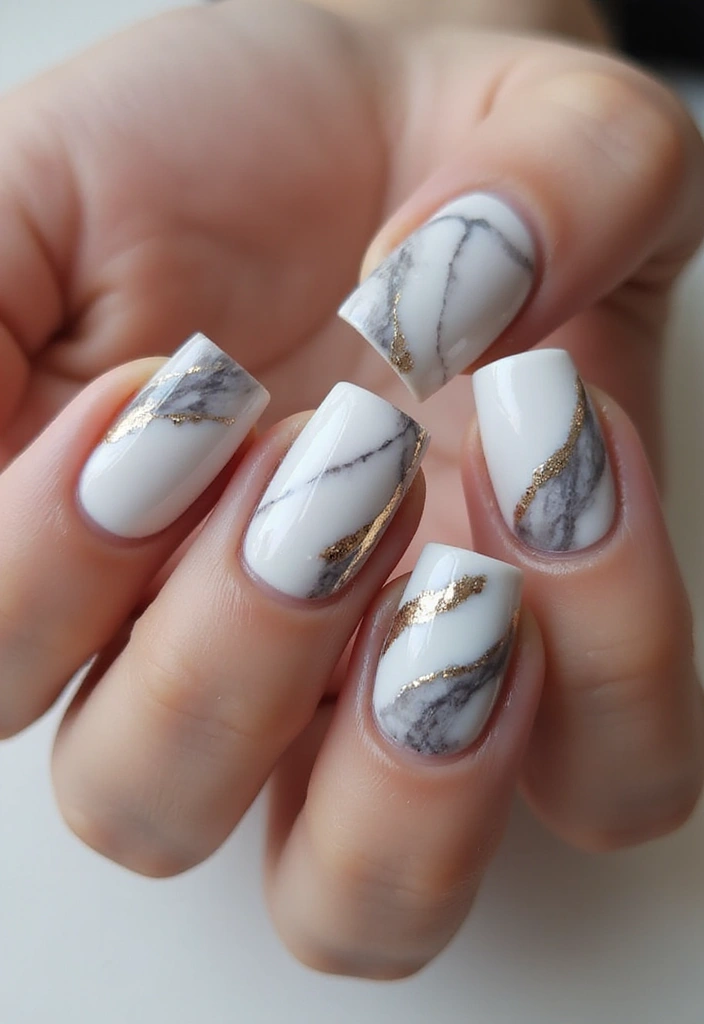
Marble nails are the epitome of elegance and style. This design mimics the timeless beauty of marble stone and can be done in any color combination you fancy.
To create the marble effect, start with a base of Sally Hansen Insta-Dri, White on Time. This quick-dry white nail polish not only provides an ideal foundation but also ensures your design sets quickly, allowing you to move on to the fun part sooner.
Next, use a thin brush from the Nail Art Brush Set to swirl in your chosen colors. You can opt for classic grays and whites for a timeless look or explore softer pastels for a delicate touch. Don’t hesitate to try bolder contrasts, like black and gold, for a luxurious feel.
Once you’re happy with your design, finish off with beetles Gel Polish No Wipe Gel Top Coat. This glossy top coat not only enhances the shine of your marble effect but also ensures long-lasting wear and protection for your beautiful manicure.
If you’re unsure about your swirling technique, practice on a nail wheel first. This way, you can perfect your method before committing to your nails.
7. Matte and Shine Duo
Combining matte and shiny finishes can create a unique and eye-catching look. This trend is perfect for those who want something chic without being too over the top.
Start with a matte polish in a vibrant color like the 12ml black matte nail polish to serve as your base. This polish dries quickly and provides a stunning matte effect, giving your nails a sophisticated backdrop. Once the matte layer is dry, you can elevate your manicure by adding shiny designs through nail art or accents. For example, try using the Beetles extra glossy top coat to create glossy dots or stripes on your matte red nails. This glossy finish perfectly contrasts the matte base, adding visual interest and elegance to your look.
To bring your artistic vision to life, consider the 5PCS dotting pens with 3 PCS nail painting brushes. These tools make it easy to apply intricate designs and accents, allowing you to personalize your manicure.
Just remember, always allow the matte layer to dry completely before applying the shiny accents for the best results. Using a matte top coat can help you maintain a consistent finish across all nails, ensuring your manicure looks polished and professional.
8. Tropical Vibes
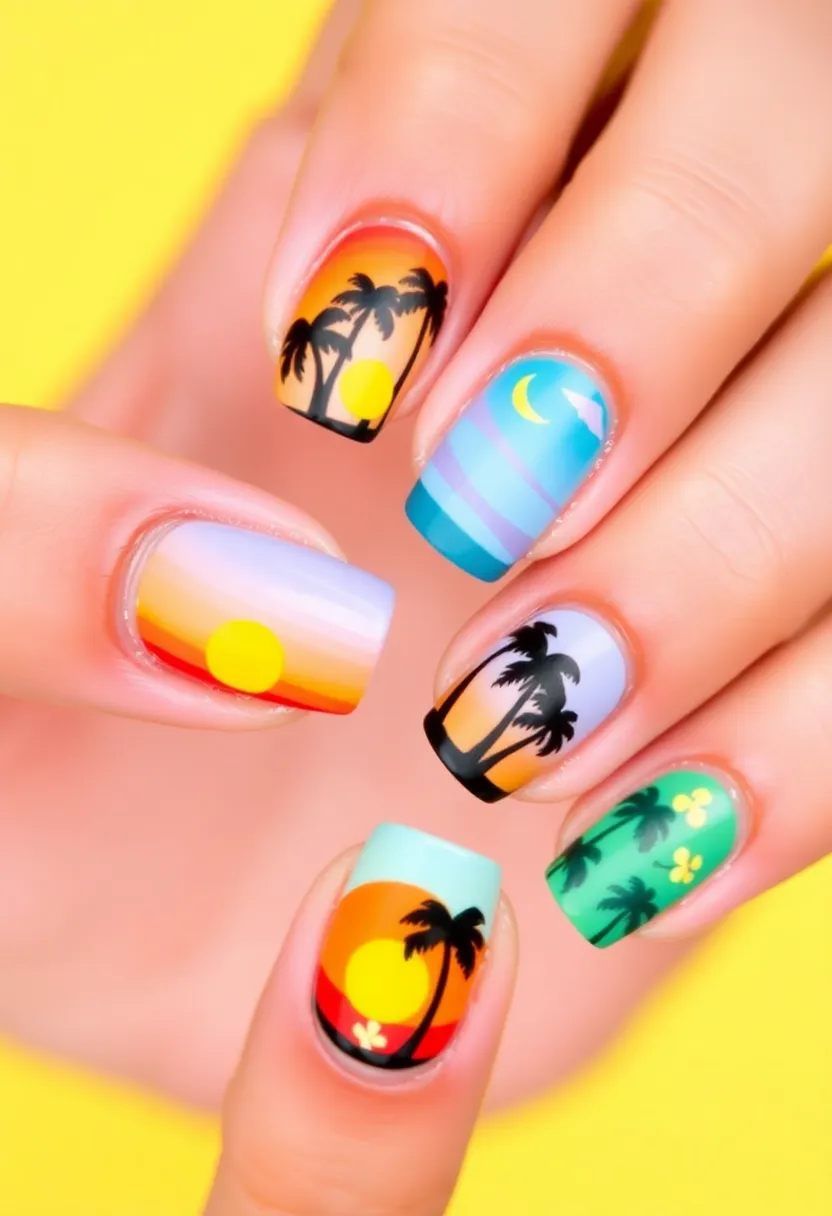
Capture the essence of summer with tropical-themed nail art! Think palm trees, sunsets, and bright colors that remind you of a sunny beach vacation. Start with a vibrant base color like turquoise or coral, and to make your design even easier, consider using the nail art brush set. This set includes fine brushes that are perfect for adding intricate palm trees, sunsets, or even tropical fruits like pineapples.
If painting by hand seems daunting, you can take the shortcut with tropical nail decals. These self-adhesive stickers feature fun designs like coconuts and flamingos, making it easy to achieve a polished look without the fuss.
Finish off your tropical vibes with a pop of color from the bright nail polish set. This collection includes 15 vivid shades that will bring your tropical theme to life. Pair this nail art with your favorite summer outfits for a delightful, cohesive look!
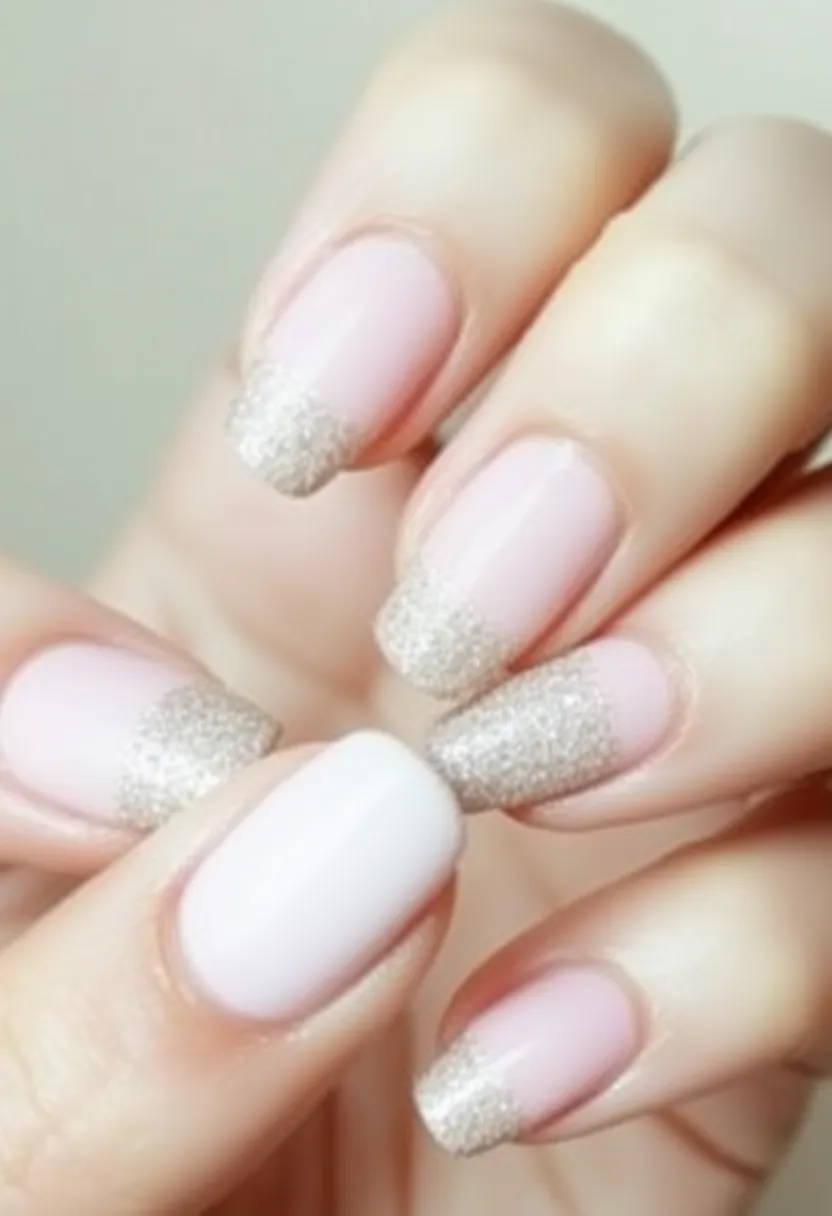
9. Colorful French Tips

The classic French manicure gets a vibrant upgrade! Instead of the traditional white tips, opt for colorful tips that express your personality. Start by selecting a base color, like soft pink or nude, and then choose vibrant hues for the tips. If you’re feeling adventurous, consider alternating colors for a playful twist.
To achieve those clean lines that make your colorful tips pop, using nail art tape for clean lines can be a game changer. This tape will help you create sharp edges, ensuring your manicure looks polished and professional.
For an extra fun touch, try experimenting with different shapes for the tips, such as triangles or a square finish. Whether you want it chic or playful, this design is versatile and can be adapted to fit any occasion. If you’re looking to add some intricate details, a nail art brush set will be perfect for drawing designs and patterns on your nails.
To complete your look, consider using nail polish set with vibrant colors that offers a range of options to get creative. With these tools at your disposal, transforming your manicure game has never been easier!
10. Cosmic Galaxy
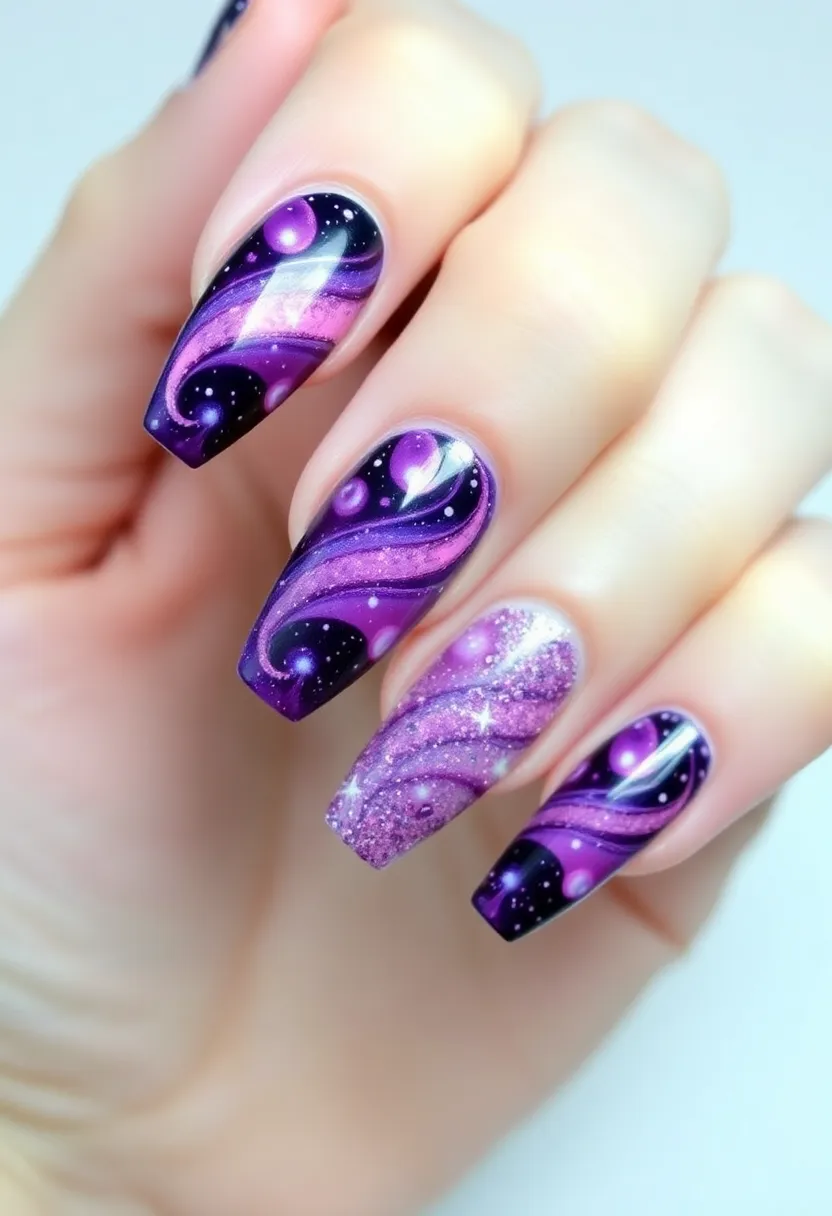
Get ready for a celestial journey with cosmic galaxy nails! This design is stunning and allows for an explosion of colors, reminiscent of a starry night.
Begin with a dark base coat, like black or deep blue, to represent the night sky. To achieve the dazzling colors of the galaxy, use a sponge to dab on shades like purple and pink, and don’t forget to add some glitter to mimic stars and planets. A great addition to your toolkit is the nail art brush set, which can help you create tiny star accents for added detail and precision in your design.
Layering different colors is the key to creating depth and dimension, and a top coat is essential for that beautiful shine. The gel top coat not only provides a glossy finish but also ensures your cosmic design lasts longer.
For that extra sparkle, consider using the cosmetic glitter set. This collection of chunky holographic glitters can enhance your nails and make them look even more impressive.
This design looks stunning but is easier to achieve than it seems!
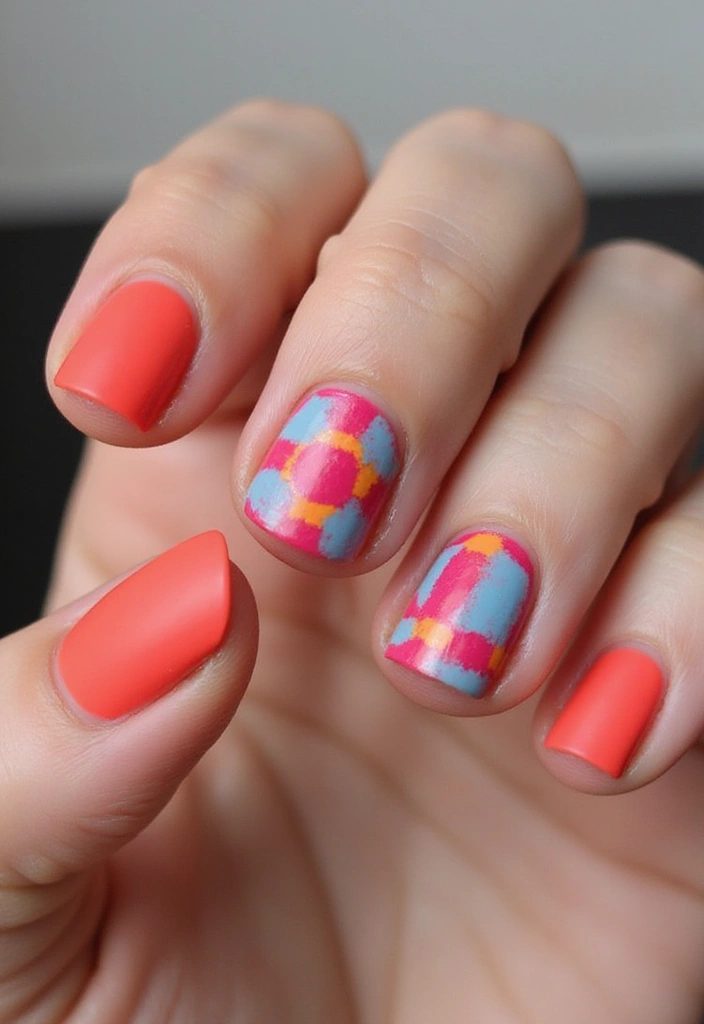
11. Color Block Madness
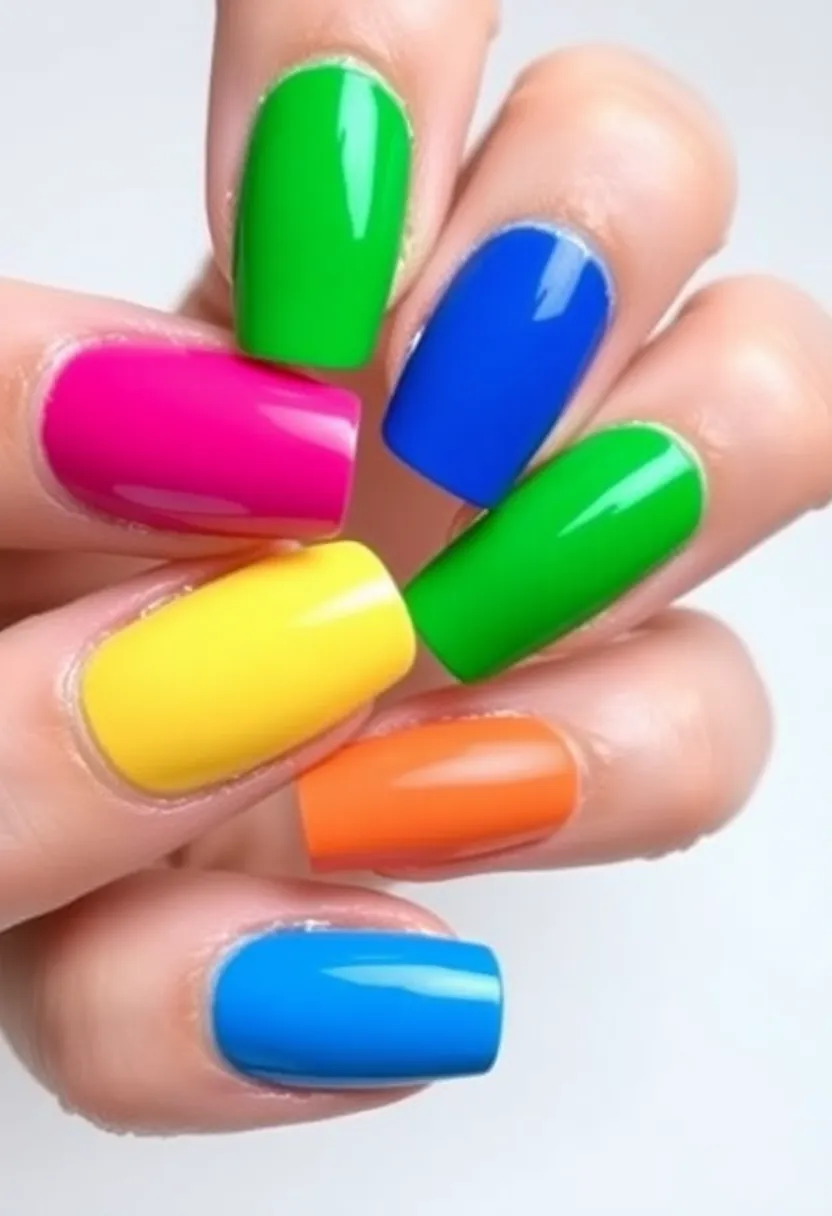
Color blocking is all the rage, and it’s a fabulous way to incorporate multiple bold colors into one manicure. This design lets your creativity flow, allowing you to place colors next to each other in striking contrasts.
Start with a base coat of one color and use tape or a nail art brush to block off sections for different colors. Vibrant hues like yellow, teal, and hot pink work beautifully together. For precise application, consider using the nail art brush set, which includes various brushes for detailed designs. The fine brushes are perfect for creating clean lines and intricate patterns.
To mask off sections for your color blocking, the nail tape for art will be your best friend. This tape helps you achieve sharp edges and prevents colors from bleeding into each other, making your manicure look professionally done.
Finally, finish with a high-gloss top coat, such as the high-gloss top coat. This not only adds an elegant shine but also protects your colorful design, ensuring it lasts longer without chipping.
Helpful tips:
– Balance your colors; if one is very bright, consider pairing it with a more subdued tone.
– Make sure each layer is dry before applying the next to avoid smudges!
12. Confetti Fun

Feeling festive? Confetti nails are the ultimate party-ready look! This design is playful and can easily be customized to match any theme or outfit. Start with a clear or nude base coat, then layer colorful dots of polish in different sizes to mimic confetti. You can achieve this fun effect by using a dotting tool, and the dotting tool set for nail art makes it super easy to create perfectly sized dots.
If you’re looking for vibrant colors, consider using the colorful nail polish set. With a variety of shades, you can play with combinations that reflect holidays or celebrations—think red and green for Christmas or pastels for a baby shower.
Alternatively, if you prefer a quicker approach, you can use nail art stickers to add confetti-like designs without the mess. Just apply them on your base coat, and finish with a top coat for durability and shine. Remember, keep it fun and don’t stress over perfection; the more random, the better!
13. Metallic Magic
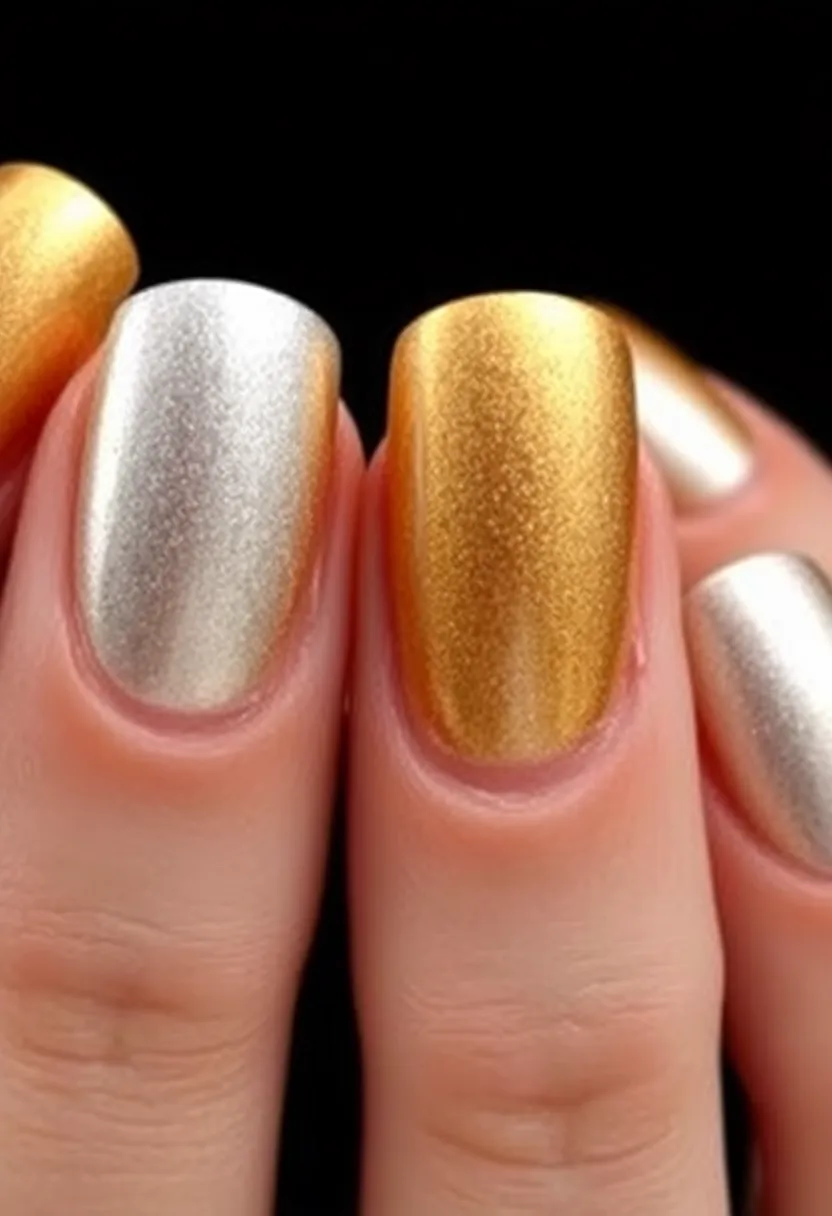
Shiny metallic nails are a gorgeous way to make a bold statement! Whether you choose gold, silver, or rose gold, metallics add a shiny touch to any look. To achieve that dazzling finish, consider using a metallic nail polish set. This kit offers a variety of colors, perfect for experimenting with different shades and textures.
For added texture and depth, you can use metallic foils, which pair beautifully with the polish. A great option is the nail foil transfer kit, which includes glue gel and stylish stickers to elevate your manicure game.
For a modern twist, consider pairing metallic nails with matte accents. Applying a matte top coat, like the matte top coat, over one or two nails can create an edgy contrast that truly stands out.
Helpful tips:
– Use a base coat to help the metallic polish adhere better and last longer.
– Play around with these products to find the perfect balance for your unique style!
14. Watercolor Whimsy
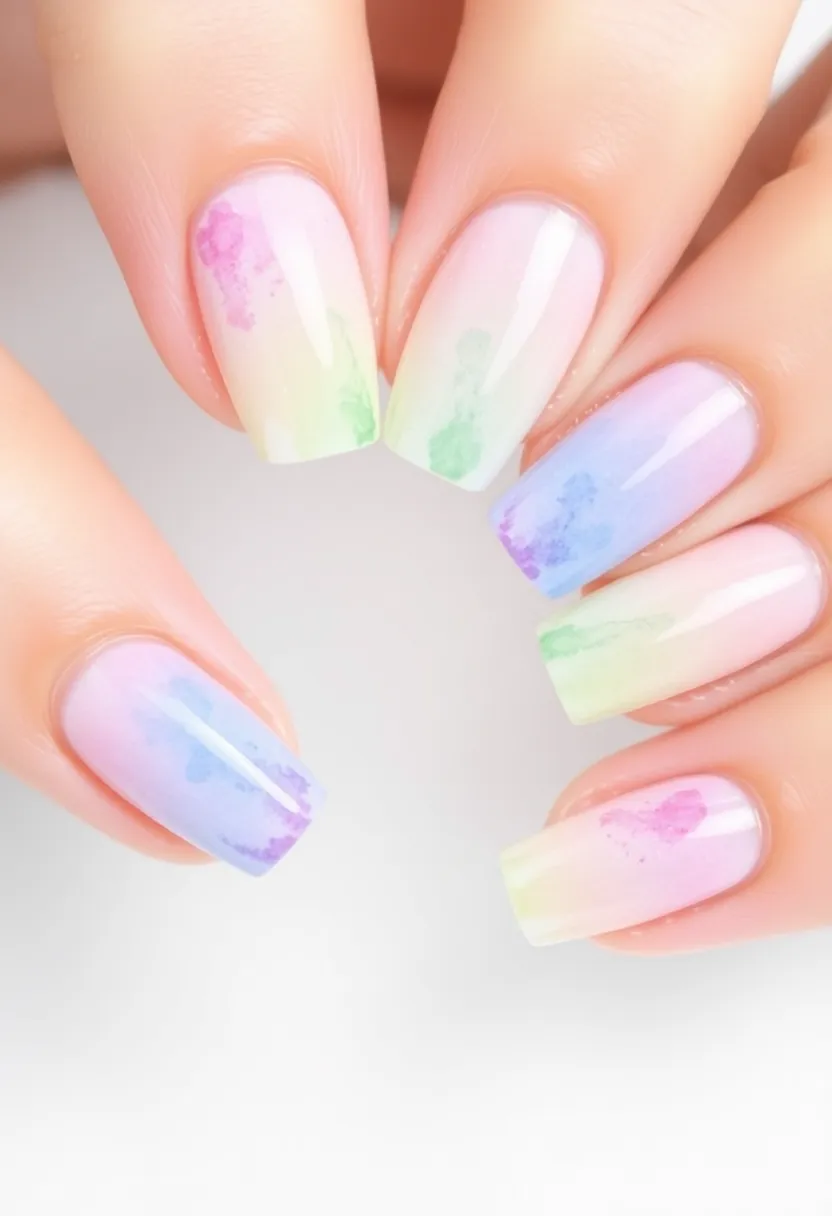
Watercolor nails are a soft and dreamy design that looks like a piece of art on your fingertips. This style uses the blending technique to create a gentle wash of colors, making it perfect for spring and summer.
To achieve this look, start with a white or light base and enhance your technique with the Watercolor Nail Art Brush Set. This set includes a variety of brushes ideal for applying and blending the diluted nail polish in various colors. The thin brushes allow for delicate application, creating that beautiful watercolor effect.
For the polish, consider using the Dilutable Nail Polish Set. This affordable option enables you to mix and dilute the colors easily for that soft wash you’re aiming for. It’s a budget-friendly choice that doesn’t compromise on the artistic finish.
To add a touch of sparkle that mimics sunlight reflecting off water, finish with a layer of Glitter Top Coat. This top coat features reflective glitter that beautifully complements the watercolor design, elevating your manicure to the next level.
By using these products, you’ll create stunning watercolor nails that are sure to impress!
15. Striped Perfection
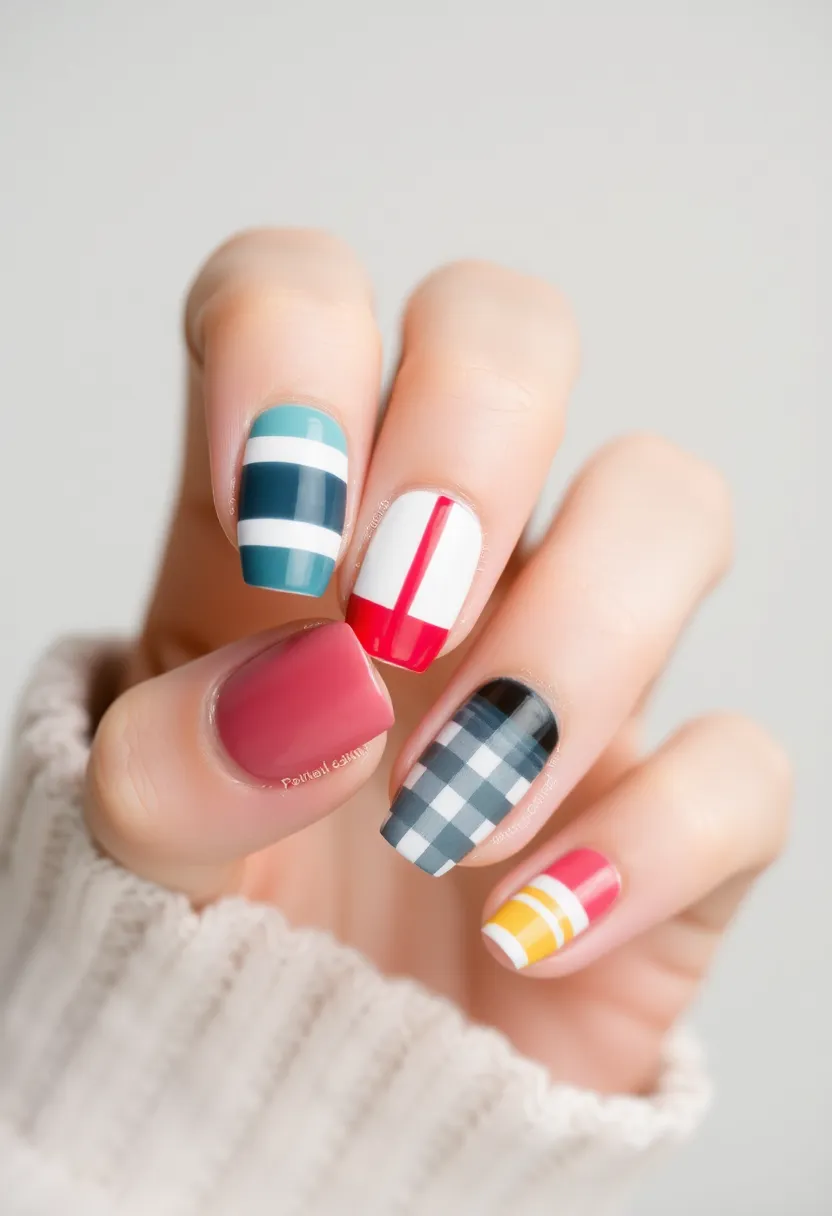
Stripes can be a simple yet striking way to add color to your nails. Think classic pinstripes or bold, chunky lines. This design is versatile and suits any occasion!
Start with a solid base color and then use either striping tape for nail art or a thin brush from a quality nail art brush set to add the stripes in contrasting colors. You can use a mix of vertical, horizontal, or diagonal lines for added flair.
For success:
– Use different widths for your stripes to create visual interest. The striping tape comes in various sizes, making it easy to achieve that perfect look.
– Don’t overload the design; sometimes less is more, especially for a polished look. Additionally, consider enhancing your color palette with a nail polish in assorted colors to really make those stripes pop.
16. Dazzling Dot Nails
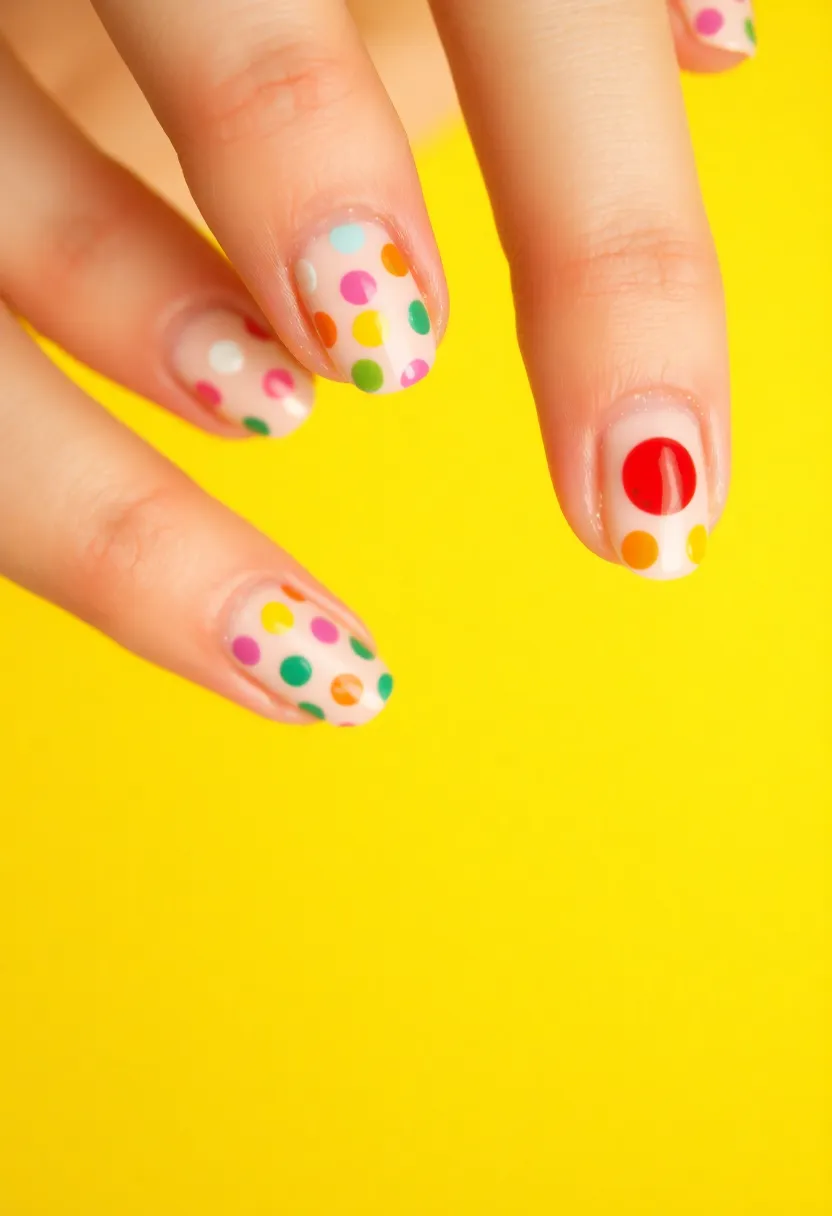
Get playful with polka dots! This timeless nail art is super easy and perfect for anyone looking to add a sprinkle of color to their nails. Start with a solid base and then use a dotting tool to create dots in various colors. For this, consider the dotting tool set, which comes with multiple sizes to help you achieve those perfect dots with ease. You can go for a uniform pattern or mix sizes and colors for a whimsical touch.
Once you’ve added your dots, finish with a shiny top coat to keep everything smooth. The Top Coat Nail Polish from Sally Hansen is great for providing a quick-dry, long-lasting finish that enhances the vibrancy of your design.
You can use dot colors that are similar for a more subtle look or contrasting colors for a bolder statement with the nail polish set, which offers a variety of bright shades to choose from. Don’t stress about perfection; the charm of polka dots lies in their fun nature!
17. Artistic Brush Strokes
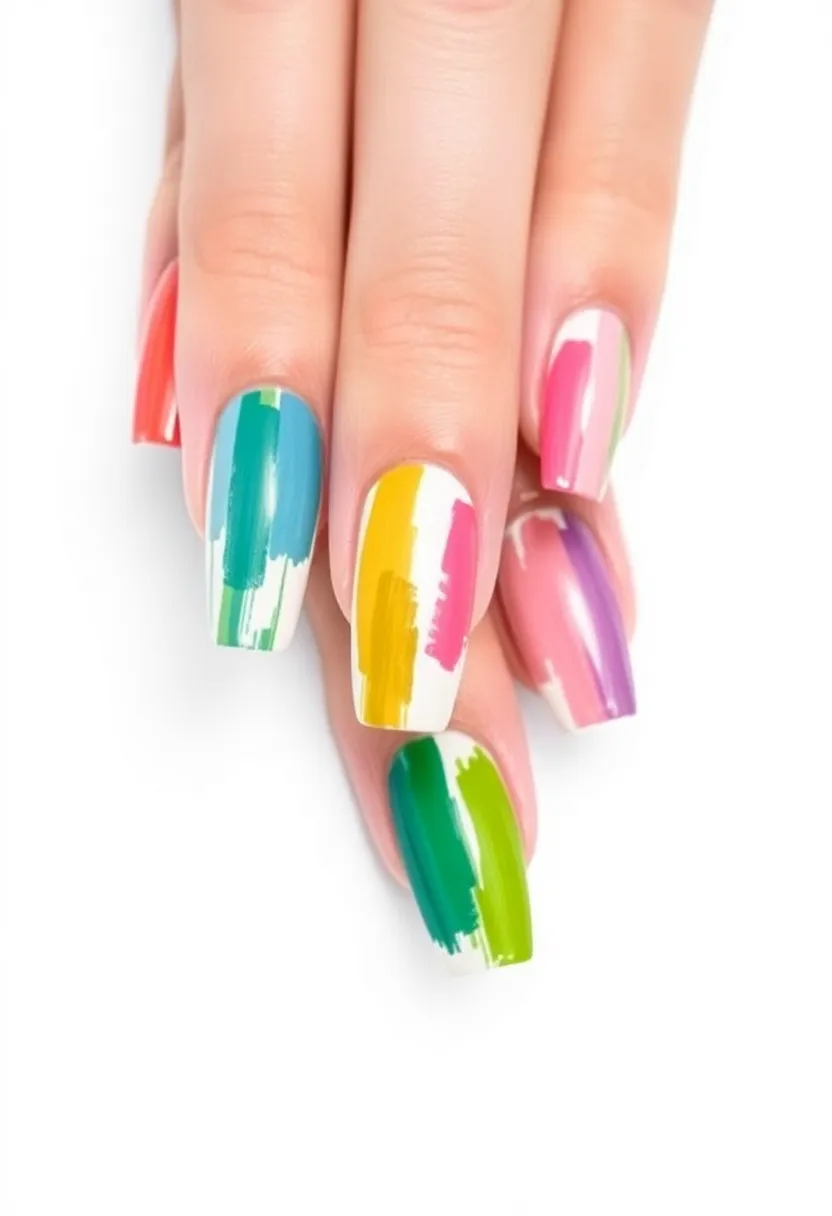
Channel your inner artist with brush stroke nails. This creative look mimics the strokes of a paintbrush and is both fun and unique!
To achieve this design, start with a wide nail brush, such as the wide nail art brush set. This versatile tool allows you to swipe on colors in different strokes, layering them to create contrast and depth.
You can choose a monochromatic palette for a chic vibe or go wild with multiple colors. For your color selection, consider the nail polish set (assorted colors), which includes a variety of bright shades perfect for your artistic vision.
Once you’ve perfected your brush strokes, don’t forget to finish with a glossy top coat. The glossy top coat for nails will give your design a stunning shine and enhance its durability, ensuring your artwork lasts longer.
Helpful tips:
– Don’t be afraid to be bold with colors that clash; this design is all about creativity!
– You can even add a sparkle accent on one nail for an extraordinary touch.
18. Jewel Tones
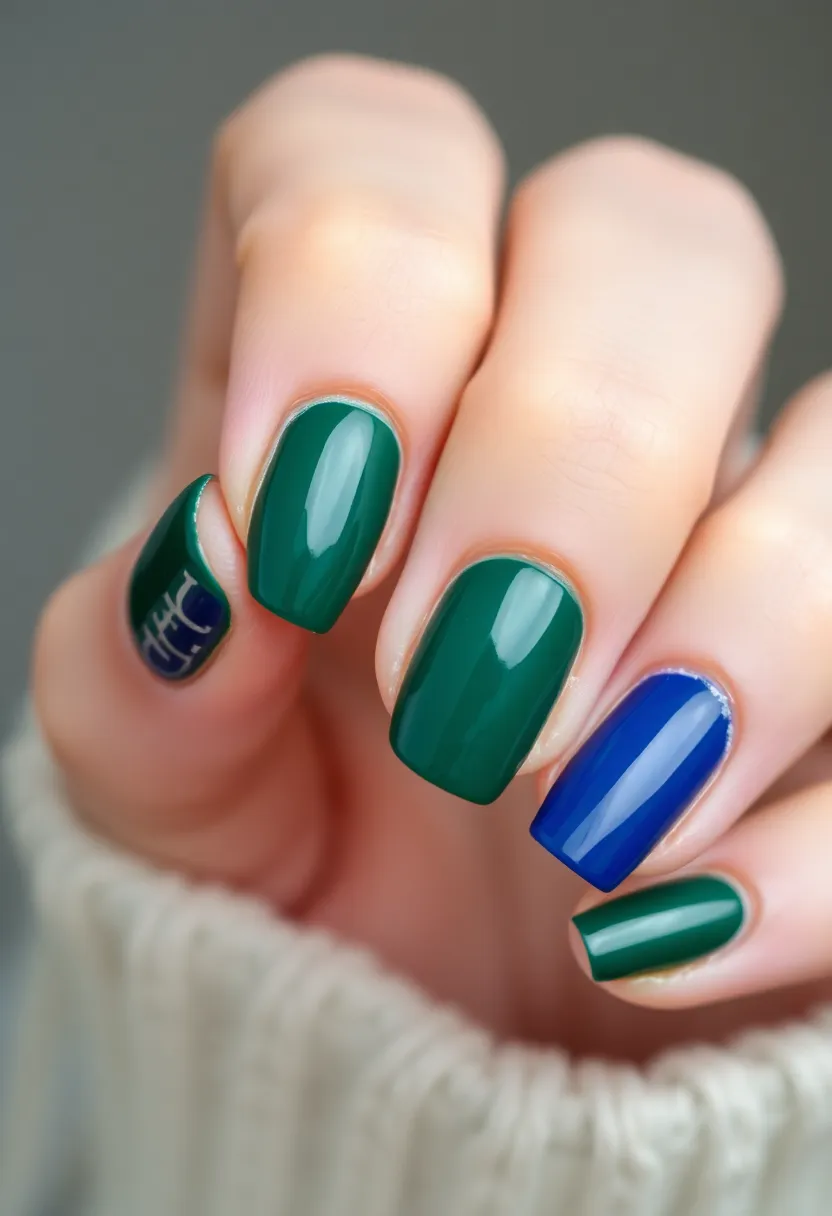
Jewel tones are rich, deep colors that look luxurious on nails. Think emerald greens, sapphire blues, and ruby reds for an elegant touch. These colors work beautifully as solids, or you can elevate your manicure by pairing them with glitter for added glamour. For instance, using a glitter top coat like Sally Hansen Hard as Nails Xtreme Wear, Disco Ball can create a stunning finish that truly dazzles.
Consider finishing off your look with a matte finish for sophistication or a glossy top coat for shine. A good base coat, like Sally Hansen Double Duty™, Base and Top Coat, is essential to make these vibrant colors pop and ensure a long-lasting manicure.
Jewel tones are perfect for the fall and winter seasons, but they can brighten up any outfit year-round. So grab the Sally Hansen Insta-Dri, C-hill Out in that gorgeous shiny green and get ready to transform your manicure game!
19. Tie-Dye Nails
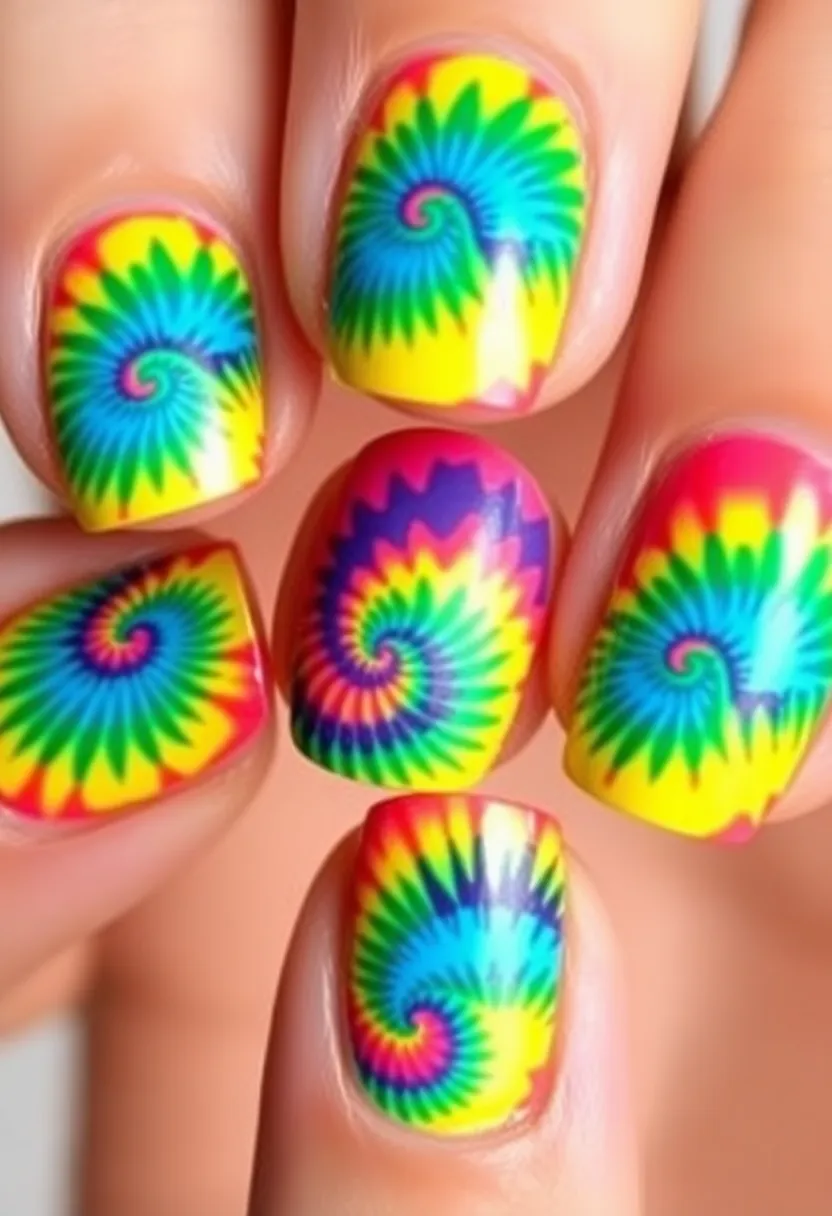
The tie-dye trend is back and better than ever, making a colorful splash on nails! This fun design allows you to mix and match colors freely. To achieve the perfect tie-dye look, start by using a small water dish to swirl different colors into a tie-dye pattern and dip your nails in. Alternatively, you can create the effect directly on your nails with a brush. To enhance your artistry, consider using the Nail Art Brush Set, which includes various brushes and dotting tools that make it easier to achieve intricate designs.
Finish your manicure with a protective layer by applying a top coat. The Top Coat Nail Polish is ideal for a high-shine, long-lasting glossy finish that helps prevent chips, ensuring your colorful creation stays vibrant longer.
For those who want to experiment with the marble effect, the Water Marble Nail Art Kit is a fantastic option. This set includes 12 colors of watercolor ink nail polish specifically designed for creating stunning marble effects, making it perfect for your tie-dye nails.
Helpful tips:
– Choose colors that complement each other for a more cohesive look.
– Be prepared for some cleanup; tie-dye can be a little messy, but it’s all part of the fun!
20. Glitter Gradient
Glitter gradients offer a chic way to wear glitter without overwhelming your look. This design starts with a solid base and gradually adds glitter from the tips downwards.
Begin by applying a base coat and allowing it to dry fully. Next, use a sponge to apply glitter polish—like the Glitter Nail Polish Set—to the tips and blend it downwards for that stunning gradient effect. The sponges are perfect for achieving that seamless blend, and you can find some great options, such as the Makeup Sponge for Nail Art, which comes in a set of 100 for various nail art projects.
To finish your manicure, apply a top coat for a smooth and polished look. If you want to switch things up, consider using the Matte Top Coat Nail Polish for a sophisticated finish that contrasts with the usual glitter sheen.
Suggestions:
– Experiment with different glitter sizes for a unique twist.
– Add a matte top coat for a sophisticated look that’s different from the usual glitter sheen.
21. Seasonal Flair
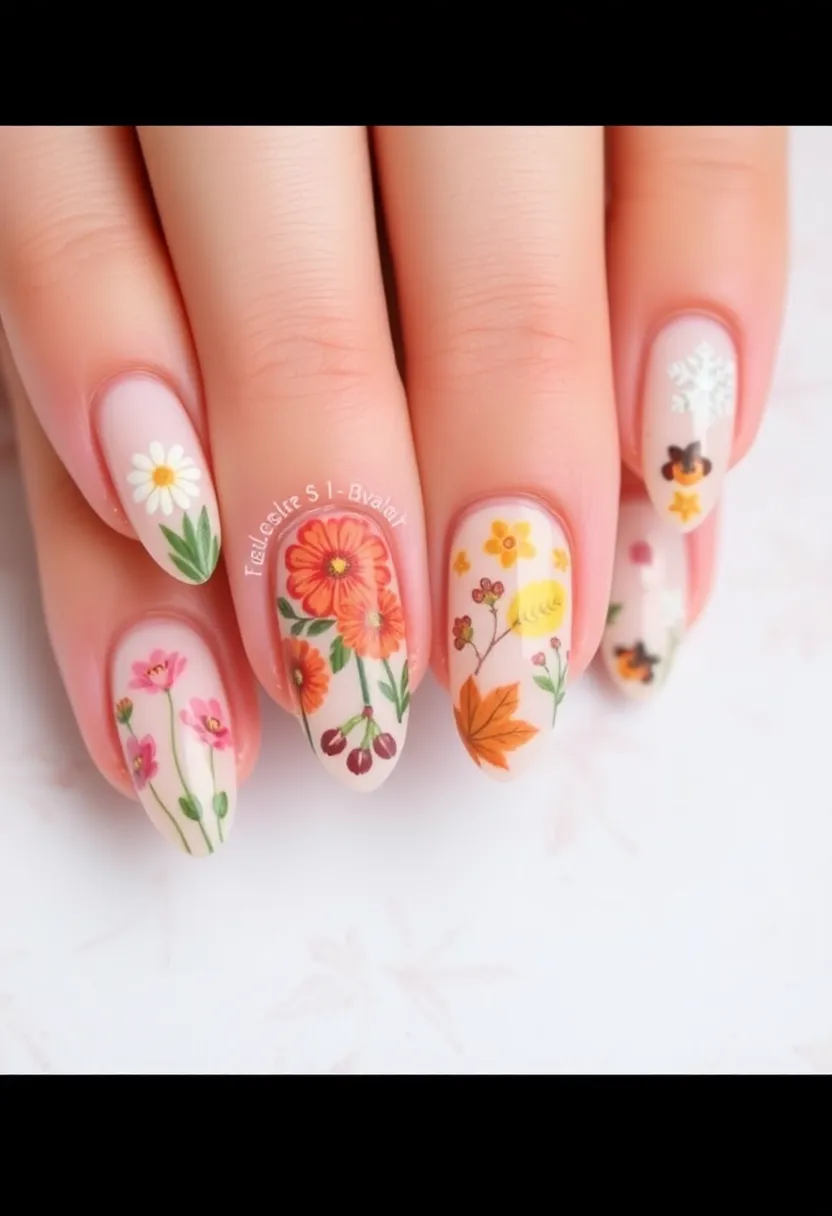
Change your nail game with seasonal themes! Each season offers a unique palette of colors and ideas, bringing the beauty of the outside world to your fingertips.
For spring, think pastels and flowers; a great way to achieve this look is with a pastel nail polish set. The soft hues in this set make it easy to create a fresh, floral design. Summer brings vibrant colors and beach motifs—perfect for sunny days at the beach. For autumn, warm tones and leaves can be beautifully represented with a variety of colors that evoke the changing landscape. Finally, winter can be transformed into icy blues and whites to mimic frosty nights.
– Keep it simple with one seasonal design per nail, or go all out with intricate themes across all nails. If you’re looking for an easy way to add some seasonal flair, nail art stickers are a fantastic option. They allow you to achieve a seasonal look without the hassle of freehand painting, letting you focus on creativity instead.
For those who love to dive into nail art, consider using a nail art brush set. This set includes various tools that can help you create detailed designs that reflect the essence of each season. Whether you’re a beginner or looking to refine your skills, these brushes will assist you in bringing your artistic vision to life.
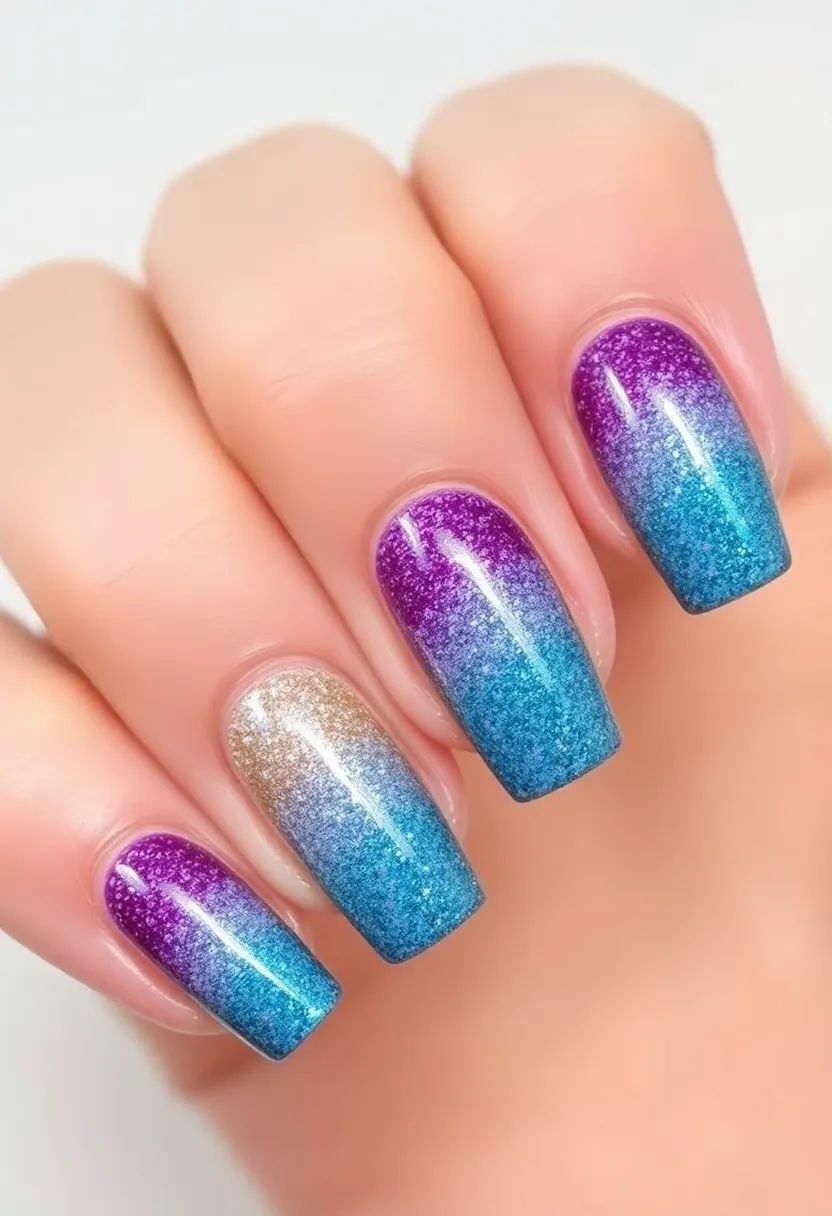
22. Ombre Glitter
Combine two of the hottest trends—ombre and glitter—for a truly stunning nail design! Ombre glitter nails use a gradient effect to transition from a solid base to a glittery finish at the tips.
Begin with a solid color base and let it dry. For the perfect application, consider using the ombre nail art brush set, which features double-ended brushes designed specifically for creating beautiful ombre and gradient effects. Once the base is dry, gradually apply glitter polish from the tip downwards, blending it into the base color. A great option for your glitter polish is the glitter nail polish set, which offers a variety of dazzling shades that will enhance your manicure.
Finally, adding a top coat is essential to keep everything looking smooth and shiny. The top coat nail polish from Sally Hansen not only provides a long-lasting finish but also ensures your design remains streak-free and vibrant.
Helpful tips:
– Choose a base color that contrasts nicely with your glitter for the best effect.
– Layering different sizes of glitter can add a fun dimension to the overall look.
23. Cute Critters
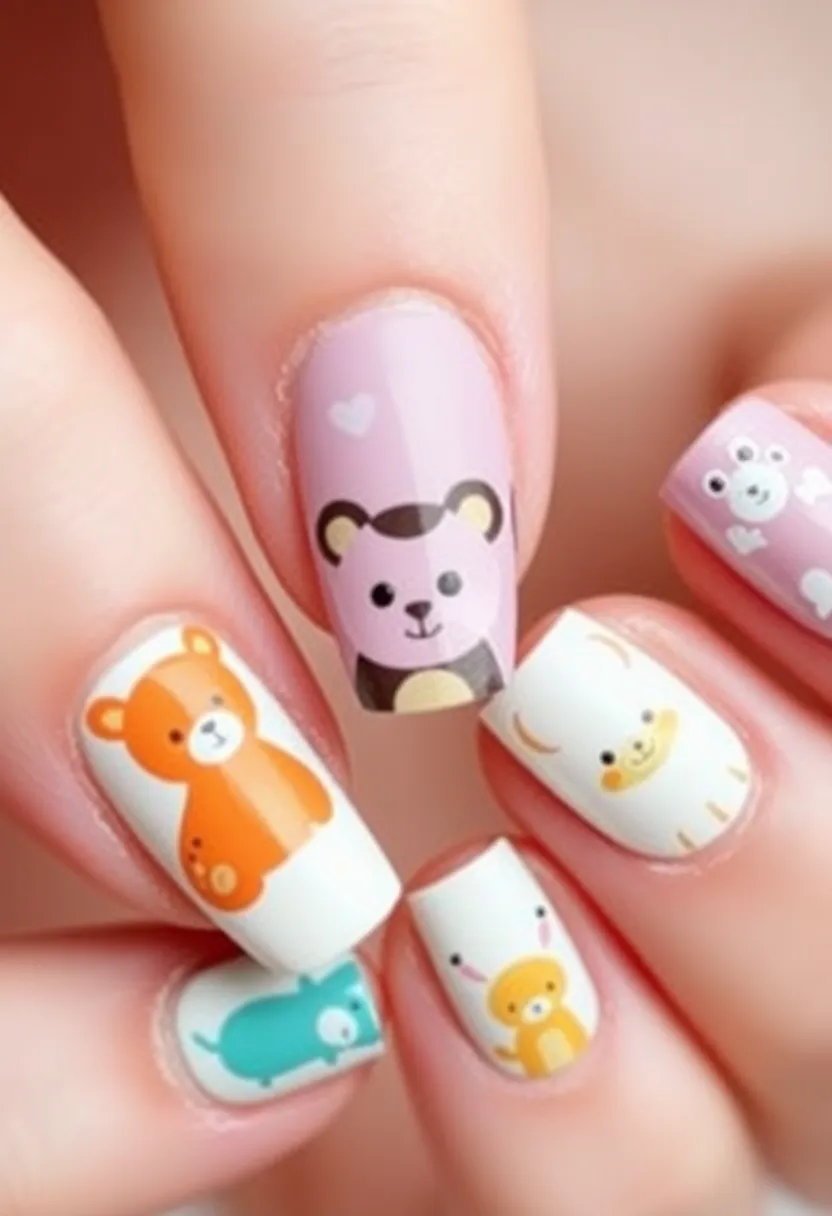
Add a bit of whimsy to your manicure with cute critter designs! From tiny kittens to playful puppies, animal-themed nails are a delightful way to express your fun side.
Start with a pastel base and embellish with tiny animal designs using nail brushes or stickers. A great tool for this is the nail art brushes set, which includes a variety of brushes ideal for creating intricate details. For even more precision, consider using a dotting tools for nail art to add in little details like eyes and whiskers. This design is perfect for animal lovers!
Keep it playful by mixing and matching different critters on each nail. If freehanding isn’t your strong suit, you can easily achieve more detailed designs with animal nail art stickers, which are lightweight and easy to apply, making your DIY manicure both fun and effortless.
24. Layered Colors
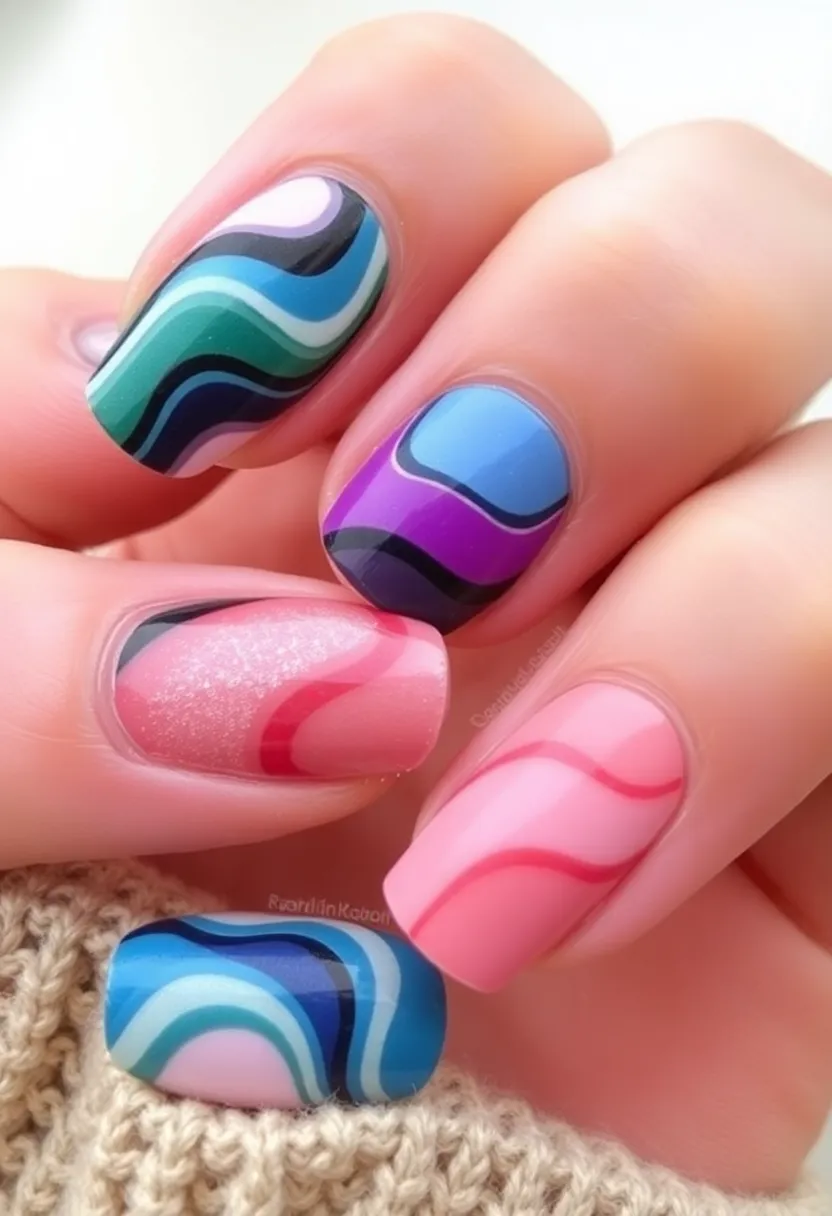
Layering colors creates a unique depth and texture to your nails, allowing for endless creativity. To get started, use a base color and let it dry completely. For the layering process, a small brush is essential for applying a different color in a wavy or zigzag pattern. You can easily achieve this with the Nail Art Brush Set, which includes various brushes perfect for detailed designs.
Consider using complementary colors to make your design pop. A vibrant selection like the Colorful Nail Polish Set can provide you with hues that work well together, encouraging experimentation with different shapes and sizes for added creativity.
Once you’re satisfied with your layered design, finish off with a high-quality top coat to enhance shine and ensure longevity. The Top Coat Nail Polish is an excellent option, offering a quick-dry formula that delivers a streak-free shine, ensuring your manicure looks polished and professional.
With the right tools and products, layering colors can transform your manicure game into something truly special.
25. Hexagon Hues
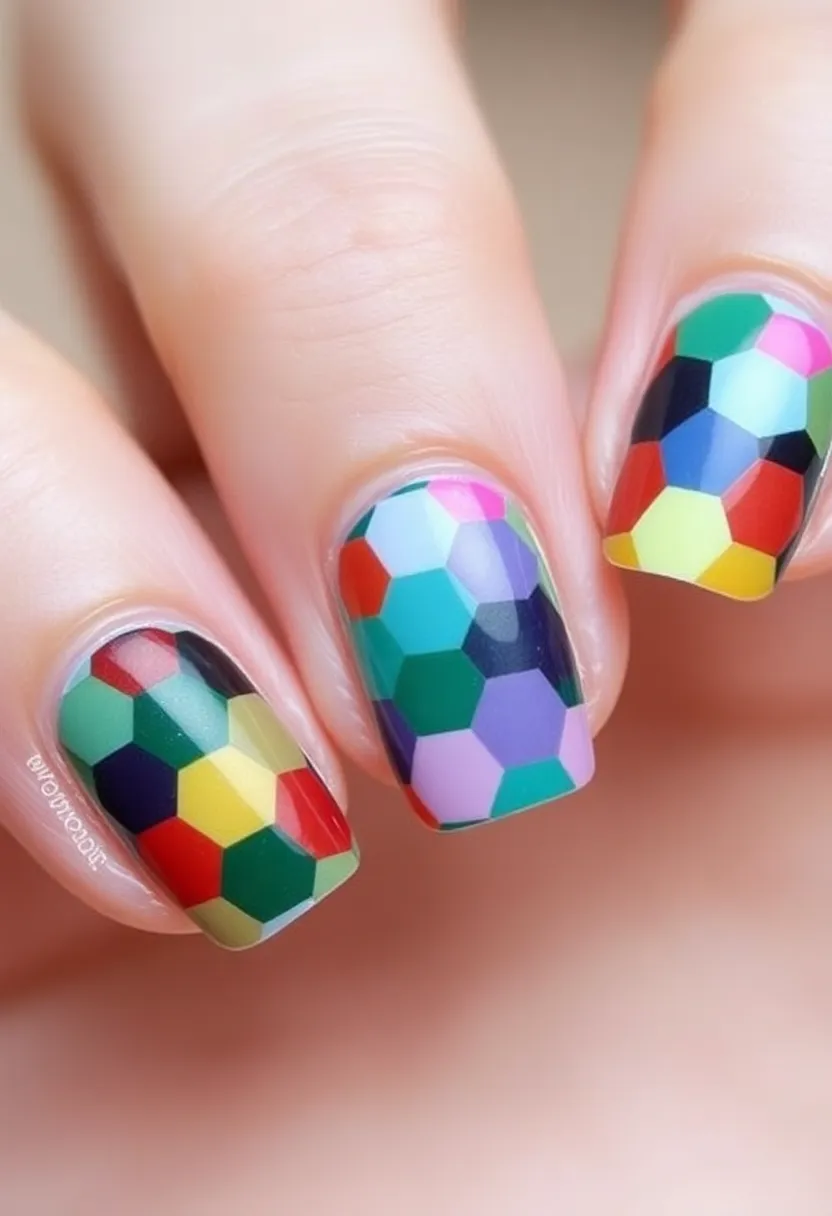
Hexagon nails are a fun and modern design trend! This geometric pattern, inspired by nature’s honeycomb, is perfect for those who love a unique twist.
Start by applying a base color and allowing it to dry completely. To create those crisp hexagon shapes, grab a thin brush or a nail art pen, like the nail art brush set, which includes various tools to help you achieve precise lines and intricate designs. Once your hexagons are drawn, you can either fill them in with contrasting colors for a bold look or leave them empty for a minimalist touch.
To keep your design intact and looking fresh, finish off with a top coat, such as Sally Hansen Double Duty™. This quick-dry, long-lasting top coat will give your nails a streak-free shine and protect your artwork.
For those who want to elevate the sharpness of their hexagon edges, consider using nail art tape. This tape allows you to create clean lines and shapes, ensuring that your hexagon nails look professionally done.
This design pops with both bright colors and even monochrome palettes, offering you plenty of creative freedom. Happy painting!
Conclusion
These 25 colorful nail polish ideas are bound to ignite your creativity and transform your manicure game.
Whether you choose a sophisticated marble design or vibrant tie-dye, there’s something for every mood and occasion. So grab your polishes, unleash your inner artist, and let your nails do the talking! Which design are you excited to try out first?
Note: We aim to provide accurate product links, but some may occasionally expire or become unavailable. If this happens, please search directly on Amazon for the product or a suitable alternative.
This post contains Amazon affiliate links, meaning I may earn a small commission if you purchase through my links, at no extra cost to you.