")
Nail art has taken the beauty world by storm, and it’s no wonder why! A little creativity on your nails can bring a splash of joy to your day and express your unique style. You don’t need to visit a salon or break the bank to sport fabulous nails—these 20 stunning DIY nail art designs will have you turning heads in no time. Whether you want something simple yet chic or bold and vibrant, there’s a design here for every mood and occasion. Get your nail polish ready!
From delicate florals to eye-catching geometric patterns, let’s unleash your inner artist and get started on some fun nail art projects. Grab your colors, brushes, and let’s dive into these trendy and creative designs. You’ll want to try them all, but make sure to keep an eye out for the amazing design at #14—it’s a showstopper!
Contents
- 1. Ombre Effect
- 2. Floral Delight
- 3. Geometric Patterns
- 4. Marble Nails
- 5. Striped Chic
- 6. Negative Space
- 7. Glitter Glam
- 8. Tie-Dye Vibes
- 9. Animal Print
- 10. Color Block
- 11. Artistic Swirls
- 12. Metallic Shine
- 13. Retro Dots
- 14. Neon Ombre
- 15. Beachy Waves
- 16. Crystal Accents
- 17. Rainbow Delight
- 18. Vintage Lace
- 19. Sunflower Bliss
- 20. Jewel Tones
1. Ombre Effect
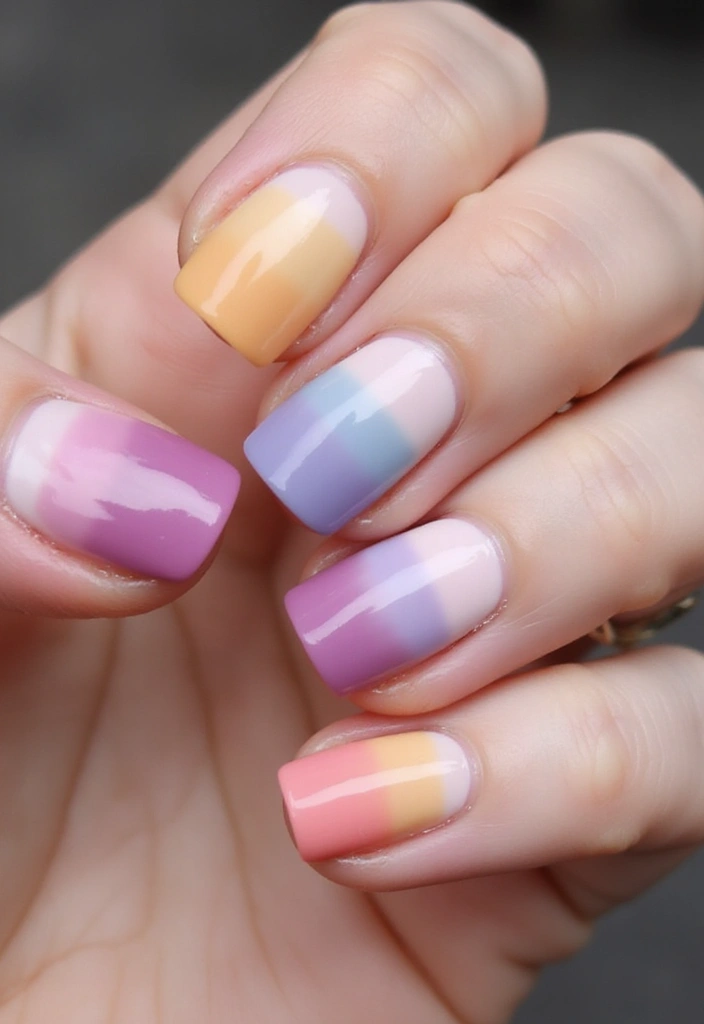
The ombre effect is all about blending colors seamlessly into one another, allowing you to create a look that can be as subtle or as bold as you desire! Start with a light base color and choose a darker shade that complements it for a stunning ombre transition. For a sophisticated touch, consider using pastel hues that blend beautifully into deeper tones.
To achieve this look, you’ll need a makeup sponge for a smooth gradient. A great choice is the makeup sponges for nail art. Simply apply your base color, then dab your darker shade onto the sponge and gently press it onto your nails. This method ensures a flawless blend that enhances the overall appearance of your nails. Finish off with a clear topcoat, like the clear topcoat nail polish, to give your design a shiny, long-lasting finish.
To help you select the perfect shades, using a nail art color wheel can be incredibly beneficial. This tool will assist you in finding complementary shades that work well together. Don’t hesitate to experiment with contrasting colors for a playful vibe! Remember to clean the sponge between colors to avoid mixing and creating muddy shades.
Try this design for everyday wear or special occasions, and you’ll be amazed at how chic and trendy your nails will look!
2. Floral Delight
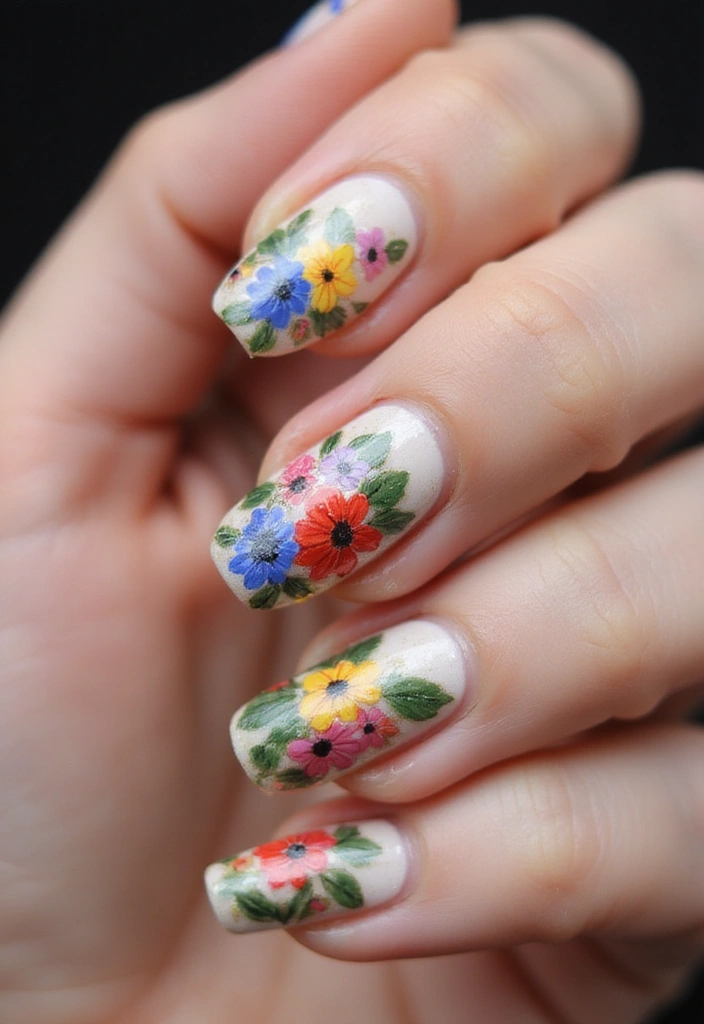
Nothing says spring quite like floral nail art! This design can be as simple or intricate as you want, making it perfect for any occasion. Start with a solid color base, and then use a fine brush or dotting tool to create little flowers on your nails. A great option to help with this is the Nail Art Brush Set, which includes various brushes and dotting tools, allowing you to achieve detailed designs.
Choose bright colors like pinks, yellows, and blues for a cheerful vibe. If you’re leaning towards a more understated style, try a monochrome look using different shades of the same color. Don’t forget to add green leaves or stems for a complete look! The Dotting Tools for Nail Art can be particularly helpful for adding those precise details to your floral designs.
To make your floral creations pop and to ensure they last longer, be sure to top off your design with a clear coat. The Clear Top Coat Nail Polish is a perfect choice, offering a quick-dry, non-toxic finish that enhances shine and durability.
This design is great for summer parties or just when you want a little extra brightness in your day. A tip: practice on a nail wheel before doing your design on your actual nails, and layering colors can add depth to your flowers. Happy painting!
3. Geometric Patterns
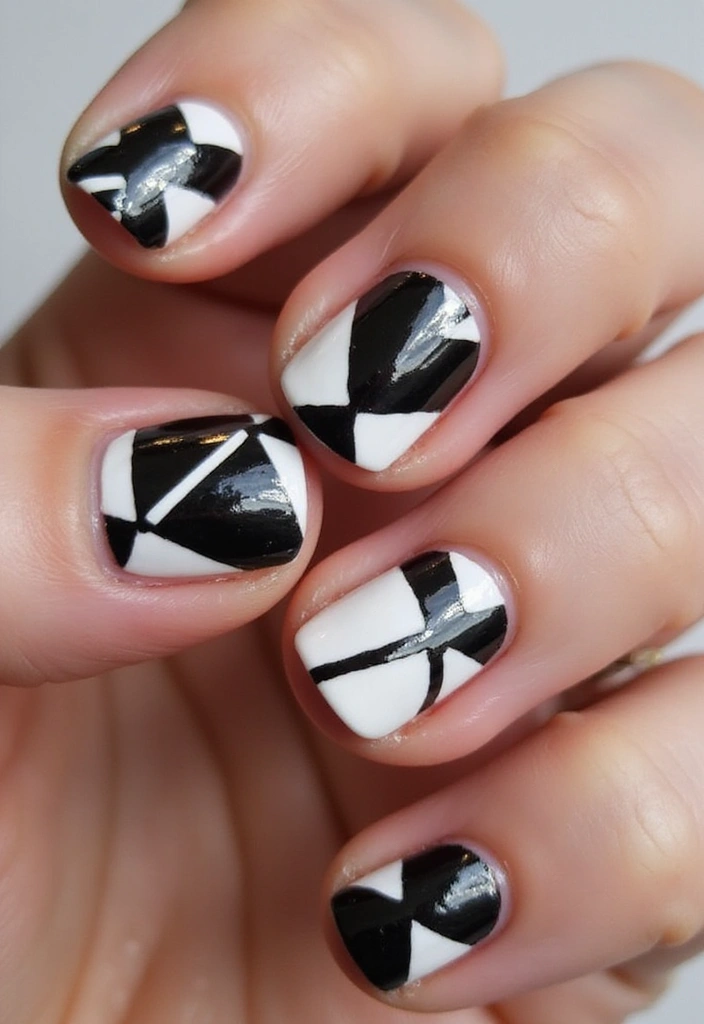
Step into the realm of modern art with geometric nail designs! This trend is all about sharp lines, contrasting colors, and bold shapes. You can mix and match triangles, squares, and stripes for a unique look.
Start with a solid color base and use painter’s tape for nail art to create clean lines. This tape is perfect for achieving the precision you need while applying your desired colors. Once you’ve painted, be sure to remove the tape while the polish is still wet for the best results, and finish off with matte top coat nail polish for that polished finish and extra shine.
– Choose a color palette that reflects your personality—neon for boldness or pastels for sophistication.
– You can even experiment with the nail art brush set to enhance your designs further. This set includes various tools that make it easier to create intricate patterns and details.
Don’t worry about perfection; the beauty of this design is in its uniqueness! This nail art style is perfect for the fashion-forward individual wanting to make a statement.
4. Marble Nails
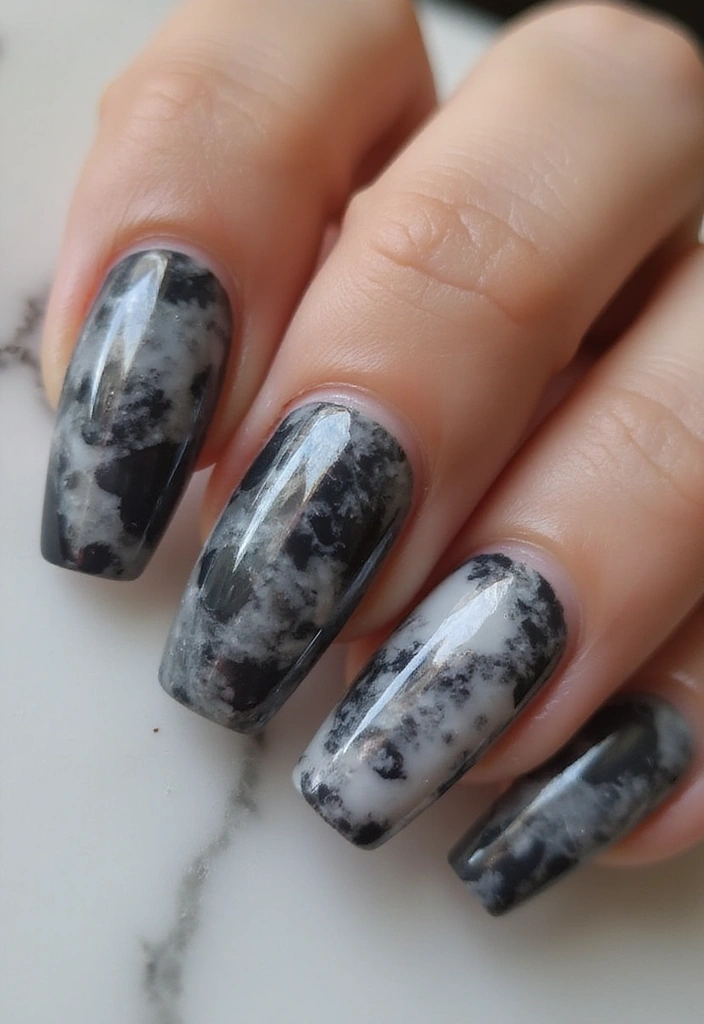
Achieve a luxurious look with marble nails! This design mimics the stunning natural patterns found in marble stone, giving your nails an elegant and classy vibe. The best part? You can easily DIY this look at home!
Start with a white base and then swirl in gray and black (or any colors of your choice) using a thin brush. A toothpick can also be helpful for creating those swirling patterns. For this, consider using the Nail Art Brush Set, which includes various brushes designed for precise application, ensuring you can create those intricate marble effects effortlessly. For a bolder look, try using vibrant colors like blues or greens!
– Don’t overmix the colors; the key is to create that beautiful marbled effect.
– To give a unique twist to your marble look, complete your design with a matte finish using the Matte Top Coat Nail Polish. This product adds a sophisticated touch that enhances the overall appearance of your nails.
– Practice on a piece of paper before applying on your nails to get the technique just right. You might also find the Nail Art Dotting Tools helpful for creating detailed patterns and designs.
Marble nails are perfect for weddings, parties, or any time you want to feel fancy!
5. Striped Chic
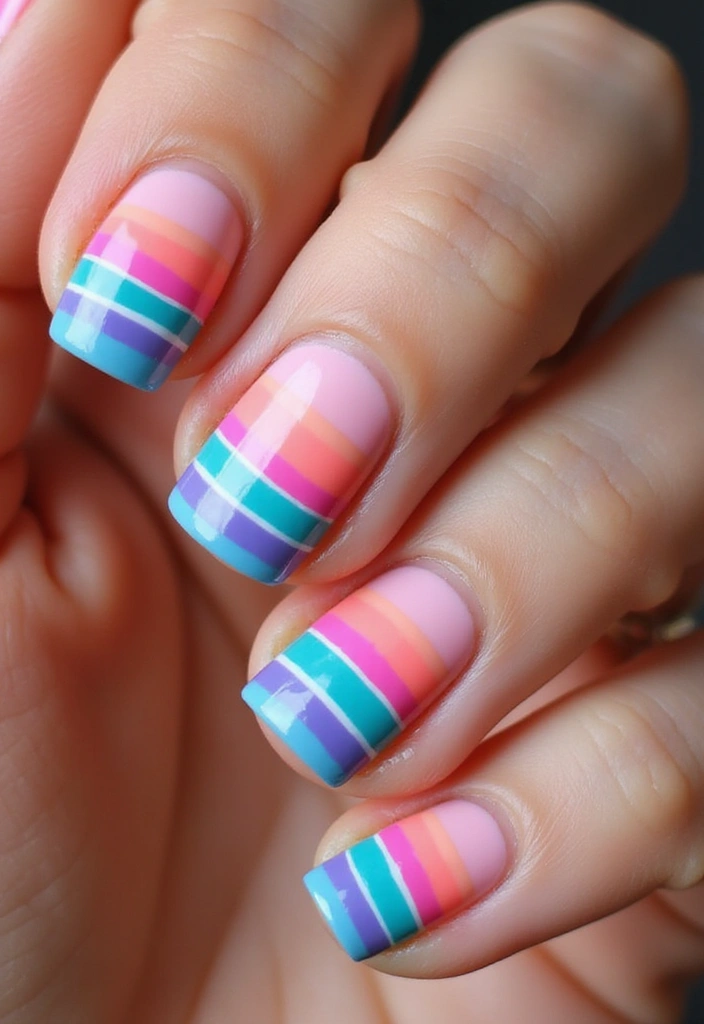
Striped nail art is timeless and endlessly versatile! Whether you prefer horizontal or vertical stripes, this design can suit any occasion. You can use classic colors like black and white for a chic look or go bold with vibrant hues.
To achieve this, start with a base coat and let it dry. Using nail art striping tape can help you create precise stripes with ease. It comes in different widths, allowing you to experiment with various stripe sizes for a fun twist! After applying your stripes, make sure to finish with Top Coat Nail Polish for a smooth, long-lasting shine.
For an added touch, you can play around with diagonal stripes for an edgy vibe or try using colors that are opposite on the color wheel for a humorous twist. If you prefer a softer look, pastel shades work beautifully too. If you need extra precision while painting your design, consider using the nail art brush set, which includes various brushes perfect for drawing fine lines and patterns.
This striped design is great for work or casual outings, providing an effortlessly stylish touch. Happy DIYing!
6. Negative Space
Negative space nail art is all about using the natural nail as part of the design. This trend is super modern and chic, perfect for those who appreciate a more minimalist approach to nail art.
Start with a clear base coat, like Sally Hansen Double Duty™, Base and Top Coat, to protect your natural nails while providing a smooth surface for your design. Then, use contrasting colors to create shapes or patterns that leave part of the nail bare. You could try a half-moon shape at the base of your nails or experiment with fun geometric designs.
For added sparkle, consider incorporating Color Craze Nail Polish, Glitter Bomb at the tips of your nails. This glitter polish enhances your negative space design without overwhelming it, adding just the right touch of glamour.
Don’t forget to have the right tools on hand! A Nail Art Brush Set is essential for creating those intricate shapes and lines. Each brush in the set will help you achieve precise designs that are unique to your style.
Negative space designs are perfect for any occasion and add a sleek finish to your nails without being too over the top. Enjoy the process of creating your own stunning nail art at home!
7. Glitter Glam
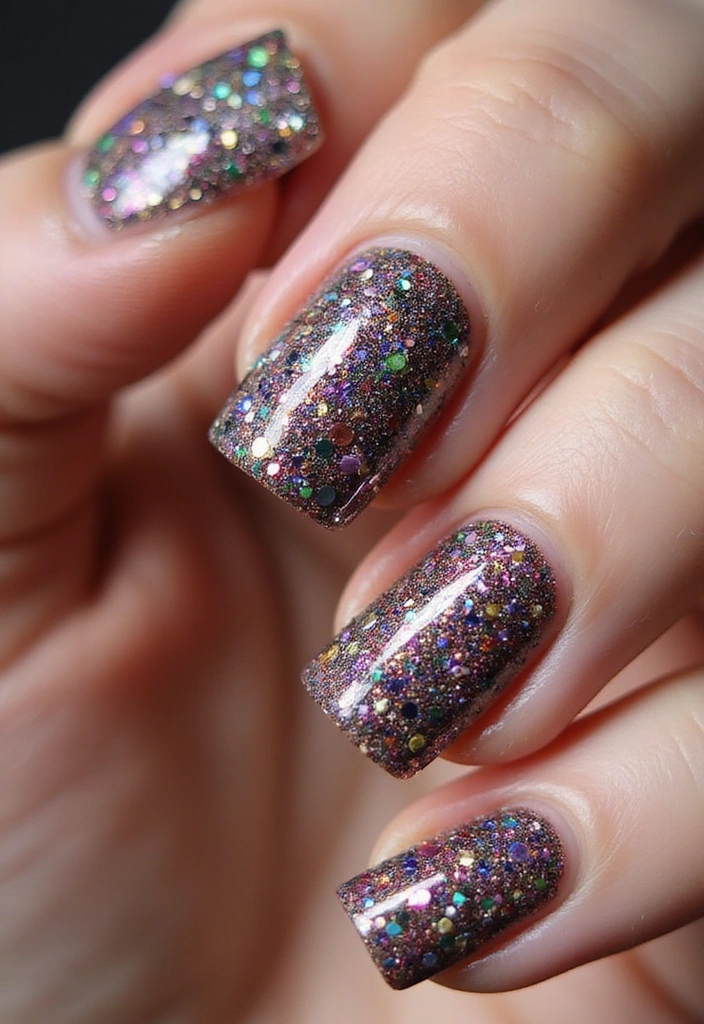
Bring on the sparkle with glitter nail art! This design is perfect for parties and special occasions when you want to shine. You can go all-out with full glitter nails or use glitter as an accent for a more subtle approach.
Start with a base color of your choice. For full glitter nails, apply a glitter polish directly on top using a glitter nail polish set that offers a beautiful range of colors. If you prefer accents, use a makeup sponge, like the makeup sponge applicators, to dab glitter polish on the tips for a lovely gradient effect.
To smooth out any rough glitter edges and add extra shine, finish with a coat of top coat nail polish. Mixing different sizes of glitter can create a fun dimensional effect, and using a small brush allows for precise application in specific areas for a more controlled design.
This sparkly look will certainly make your nails the center of attention at any celebration!
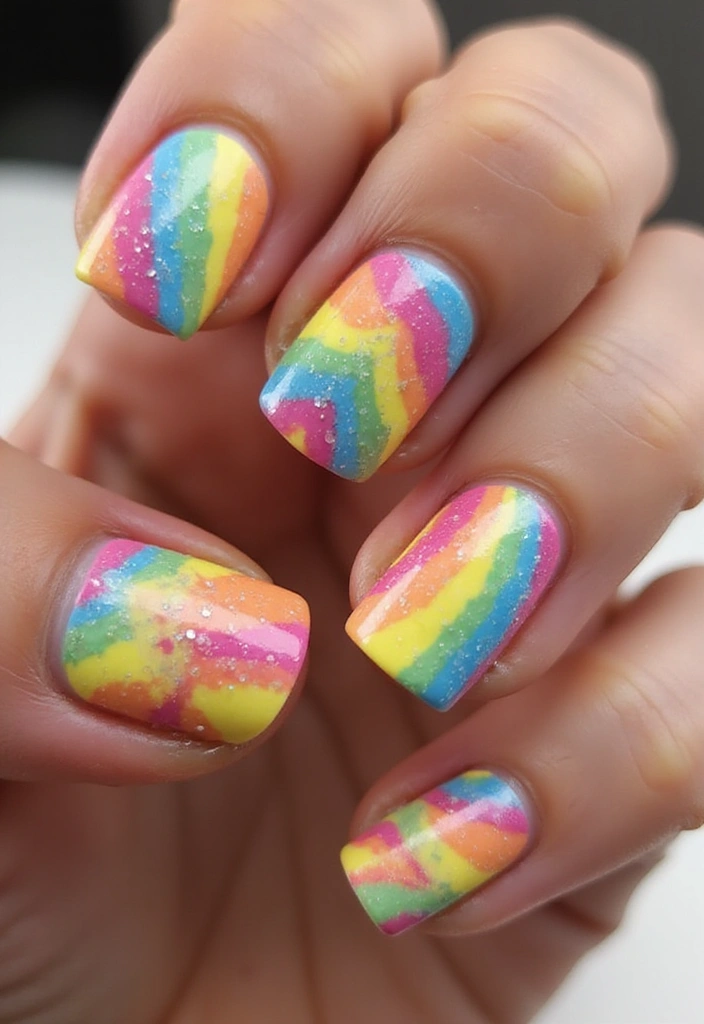
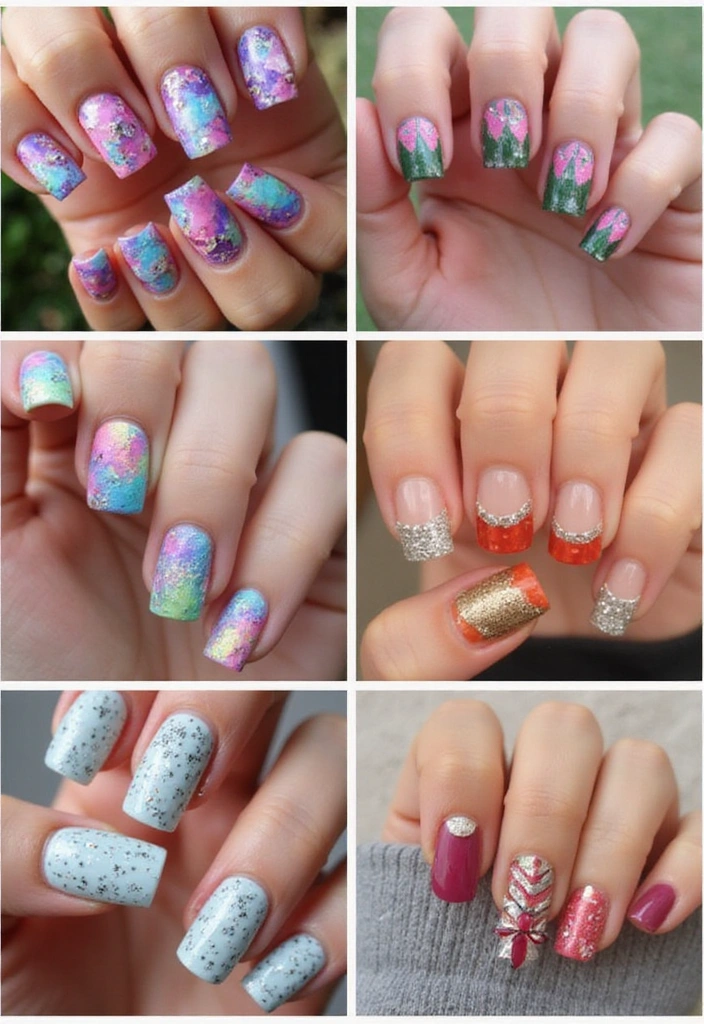
8. Tie-Dye Vibes
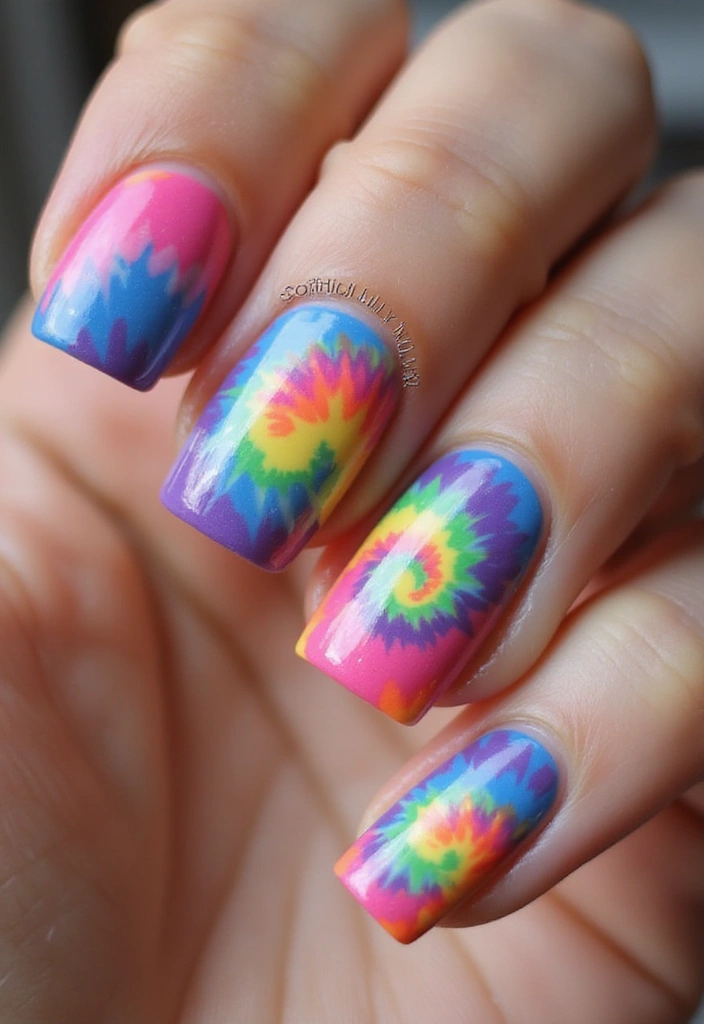
### 8. Tie-Dye Vibes
Bring back the retro vibe with tie-dye nail art! This playful design is perfect for summer and adds a burst of color to your nails. You can choose any color palette, but bright and bold colors really pop!
Start with a white or light base color, then use a small brush or a sponge to dab on your chosen colors. For this, consider picking up the Nail Art Brush Set. It includes a variety of brushes that help you create those swirling motions for that iconic tie-dye look. Don’t forget to seal it with a top coat for durability; the matte top coat is a great option if you’re looking for a unique finish.
Feel free to experiment with colors to find your perfect tie-dye combination. The Bright Nail Polish Set offers an array of vibrant shades that can really enhance your design. If it gets messy, remember to use a clean-up brush to tidy around your nails.
This cheerful design is sure to brighten up your day and is perfect for beach outings or festivals.
9. Animal Print
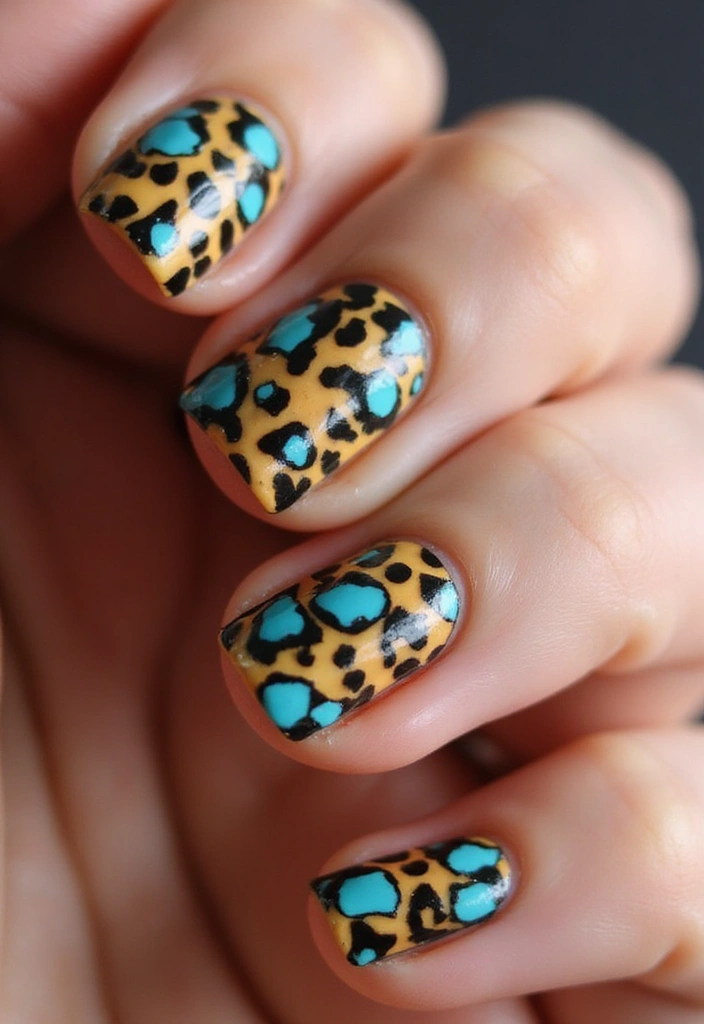
Unleash your wild side with animal print nail art! Whether you go for classic leopard spots or zebra stripes, this design is bold and fun. It’s a perfect way to express your personality!
Start with a base coat in a neutral tone like beige or light gray, and to ensure a smooth application, consider using Sally Hansen Double Duty™, base and top coat for that added streak-free shine.
For leopard print, use a small dotting tool to create random spots with a darker shade. The 5PCS dotting pens with 3 PCS nail painting brushes are perfect for this, giving you the precision needed to make those spots pop!
For zebra stripes, use a thin brush to paint on black stripes. The Nail art brush set includes a variety of brushes that make it easy to create those sleek lines.
– Experiment with different color palettes; animal prints don’t have to be traditional!
– Use a clear topcoat to protect your art and add shine.
– Don’t worry about making every spot or stripe perfect; the wild look is part of the charm.
This design is fantastic for those who want to stand out and make a statement with their nails!
10. Color Block
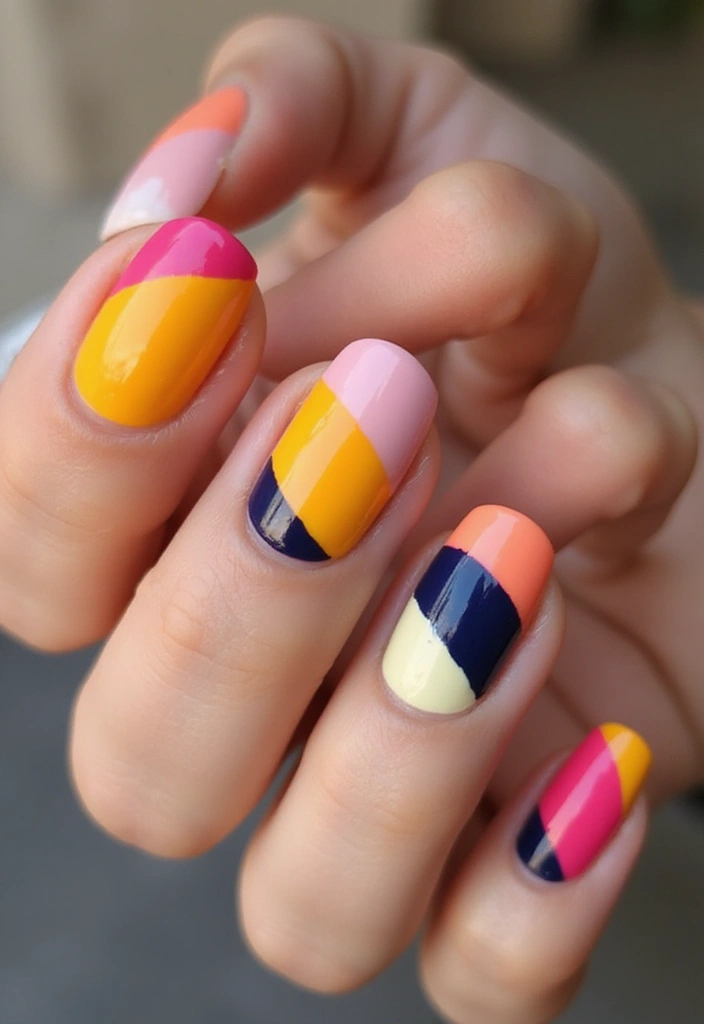
Color blocking is a fun way to combine multiple bold shades on your nails! This design allows you to get creative with your color combinations, giving an artistic flair to your look.
Start by picking at least two contrasting colors. To achieve clean lines, use nail art tape to section off parts of your nails and apply each color in its designated area. This technique can be playful with vibrant colors or sophisticated with muted tones.
Opt for colors that complement each other for a harmonious look, and don’t be shy to mix textures; incorporating both matte and glossy finishes can elevate the style. A great way to achieve this is by using matte and glossy top coat, which adds that desired contrast while also protecting your design.
Make sure to let each section dry before applying the next color. For a vibrant touch, consider using a nail polish set that features a variety of bold colors. Color block nails are perfect for making a statement, whether you’re going to a party or just want to add some fun to your everyday style.
11. Artistic Swirls
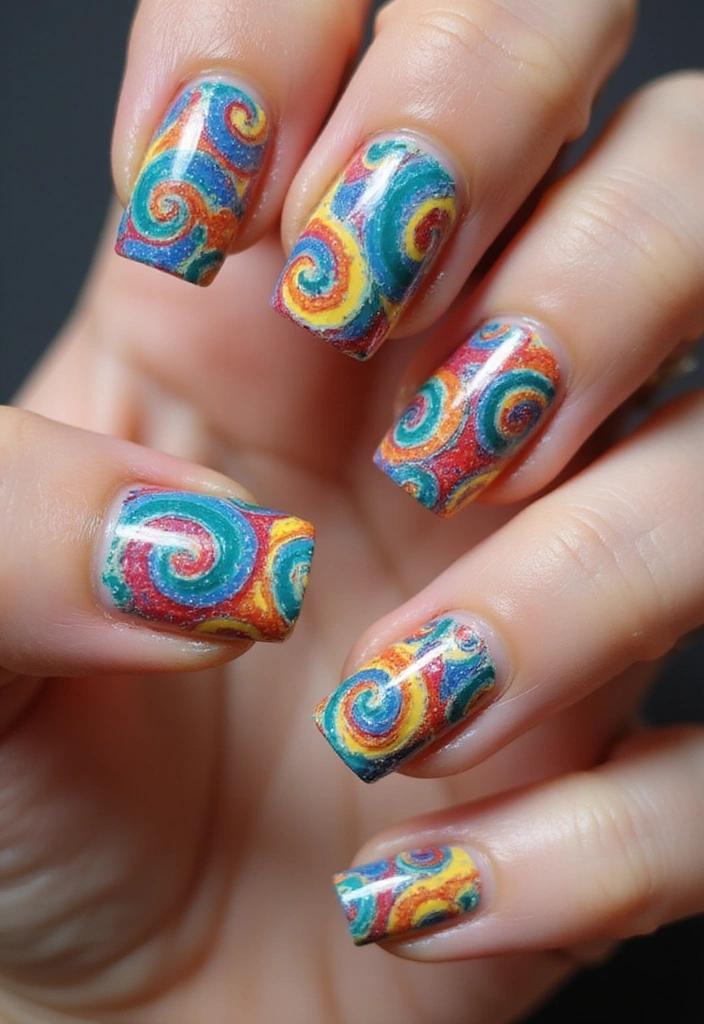
Create mesmerizing swirls on your nails that look like a piece of art! This design is perfect for those who want to express their creativity in a unique way. Use any color combination you love!
Start with a solid base and then use a thin brush from an Nail Art Brush Set to create swirling patterns. This set includes various brushes that allow you to explore both abstract designs and more defined shapes. For added effect, consider mixing matte and glossy polishes; a great option is the nail polish set (matte and glossy), which offers a vibrant color palette to enhance your swirls.
– Take your time when creating swirls; practice makes perfect!
– Use contrasting colors for a bold look.
– Experiment with different brush sizes to create varying swirl widths with the tools from your nail art dotting tools.
This style is great for anyone looking to add a dash of artistic flair to their nails.
12. Metallic Shine
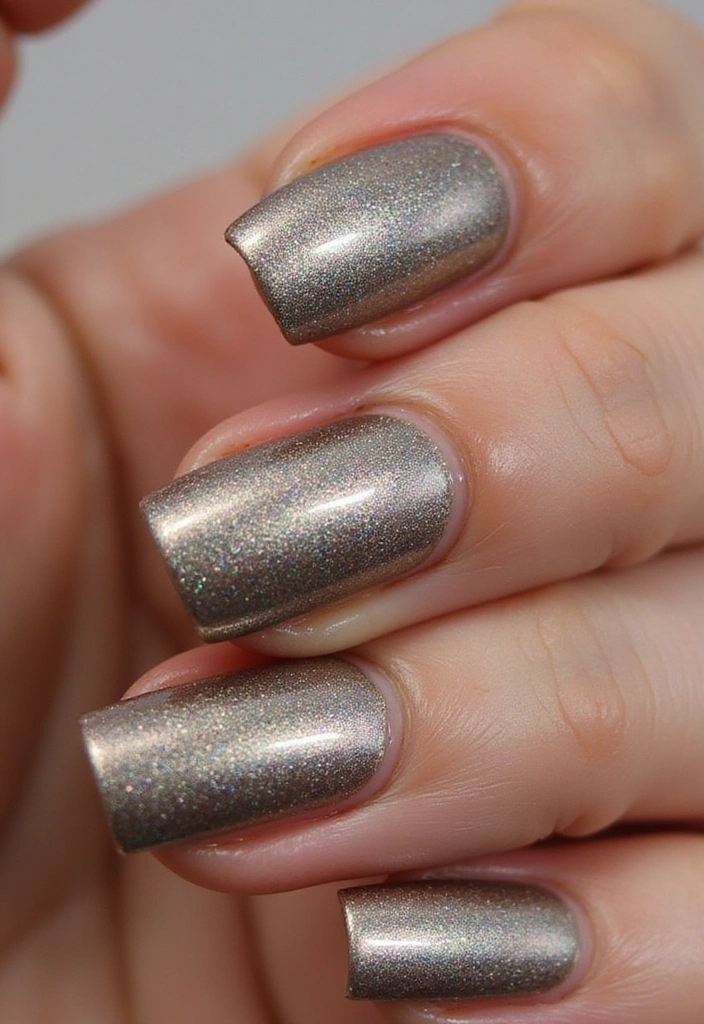
Add a touch of glamour with metallic nail art! This design gives your nails a sleek and shiny finish, perfect for a night out or special events. Choose from metallic polishes in silver, gold, or even rose gold for a chic look. For a stunning effect, start with a base coat of your choice and then layer on metallic polish. You can use a sponge to dab the metallic polish for a softer look or go straight for the brush for a bold metallic finish.
To help you achieve this stylish look, consider the metallic nail polish set. This set includes a variety of holographic metallic lacquers that will elevate your nail game.
Additionally, using nail art sponge applicators can make a significant difference in your application technique. These disposable applicators allow for precise dabbing of the metallic polish, helping you achieve that desired soft effect while minimizing potential streaks.
For an unexpected twist, pair your metallic nails with a matte top coat nail polish to mute the shine, creating a unique contrast.
Metallic nails can easily elevate any look and are a must-try for those who love a chic aesthetic! Just remember to practice even application, and you’ll have stunning nails in no time.
13. Retro Dots
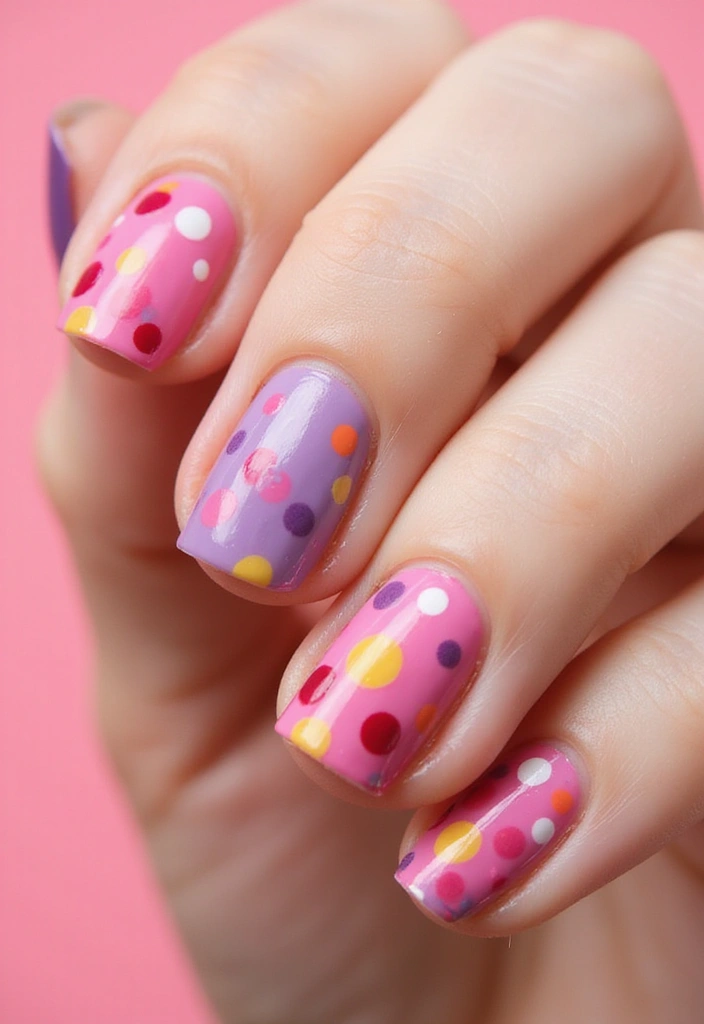
Polka dots are a classic nail art design that never goes out of style! They’re fun, playful, and can be adapted for any occasion. Use a contrasting color for the dots to really make them pop against your base.
Start with a coat of your favorite color using a vibrant polish from a nail polish set. This 15 bright color set not only gives you plenty of options but also ensures a quick dry for hassle-free application. Then, use a dotting tool or a toothpick to create dots in a different color. A great choice would be the dotting tool set, which includes various tools to help you achieve the perfect dot size and shape, whether you want to scatter them randomly, create stripes, or even design a floral pattern!
For added interest, vary the dot sizes and use colors that complement each other to enhance the design. Once you’re happy with your creation, apply a clear topcoat like the Sally Hansen Double Duty™ clear top coat nail polish. This will protect your design while adding a streak-free shine that makes your nails stand out.
This design is perfect for adding a playful touch to your everyday look or for special occasions when you want to feel fun and flirty!
14. Neon Ombre
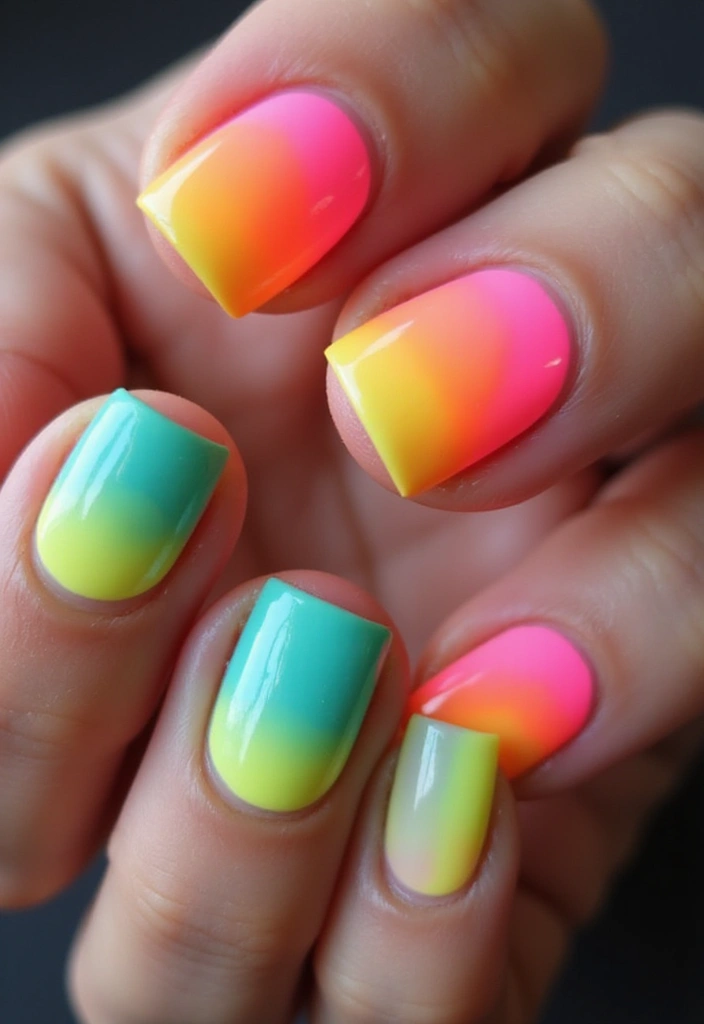
Turn heads with striking neon ombre nails! This design features vibrant colors that transition beautifully, making it perfect for summer festivals or nights out. They’re bold, eye-catching, and packed with personality.
Begin with a white or light base that allows the neon colors to pop. For the perfect application, try using Born Pretty neon nail polish set, which includes six bright colors that will help you create that stunning gradient effect. Use a makeup sponge, like the Amazon Basics cosmetic foam wedges, to apply the neon shades by layering them for a smooth transition. This method ensures you achieve the perfect ombre without any harsh lines.
Don’t forget to finish with a glossy topcoat for that shiny effect! For an extra touch of flair, consider adding some nail art stickers. These colorful floral decals can elevate your design and make your nails even more eye-catching.
Experiment with different color combinations—hot pink to bright yellow works wonderfully! Be prepared to have fun; neon colors are all about boldness and flair. This design is sure to make your nails the star of the show and is perfect for those who love to stand out!
15. Beachy Waves
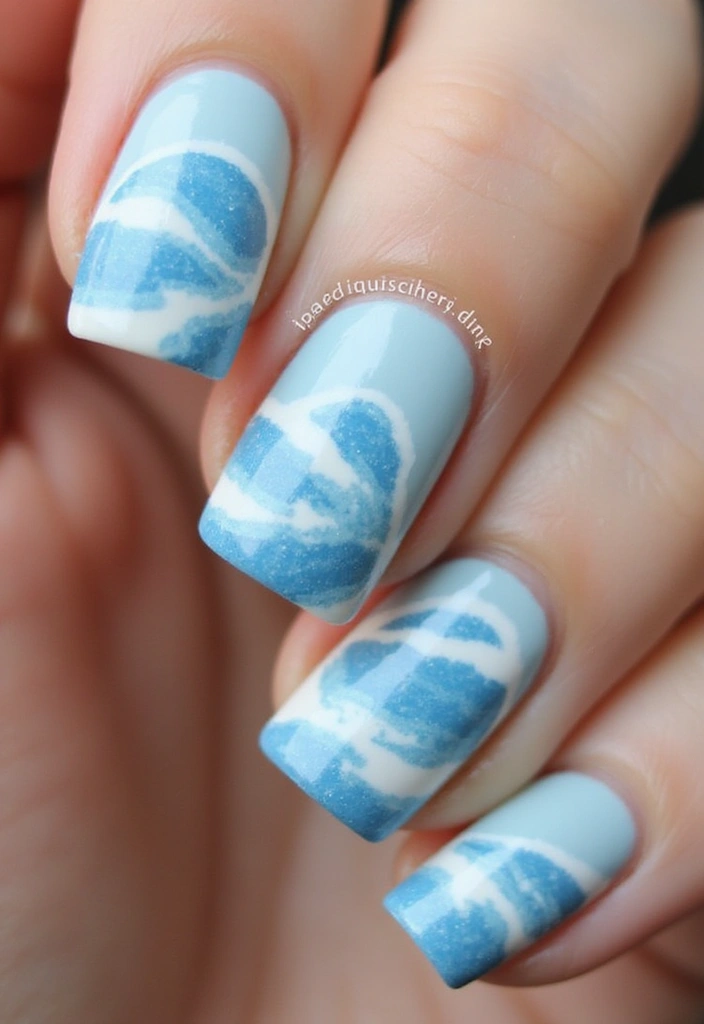
Bring the beach to your fingertips with beachy wave nail art! This design captures the essence of summer with its playful colors and ocean-inspired patterns, making it perfect for vacations or whenever you want to feel those summer vibes.
Start with a light blue base to represent the ocean. For creating swooping wave patterns that mimic the look of waves crashing on the shore, a nail art brush set is essential. Using the thin brushes from this set, you can easily apply white and darker blues to achieve that perfect wave effect.
To add an extra touch of beach charm, consider decorating your nails with tiny seashell or starfish stickers. The nail art stickers – seashells and starfish will bring a delightful marine theme to your nail design, enhancing the overall summer aesthetic.
Finish your beachy nails with a glossy topcoat to give your waves a fresh, wet look. The glossy top coat nail polish not only adds shine but also helps prolong the life of your manicure, keeping your beachy vibes intact.
This design is sure to evoke feelings of sunny days and sandy beaches, making it a fun choice for the summer!
16. Crystal Accents
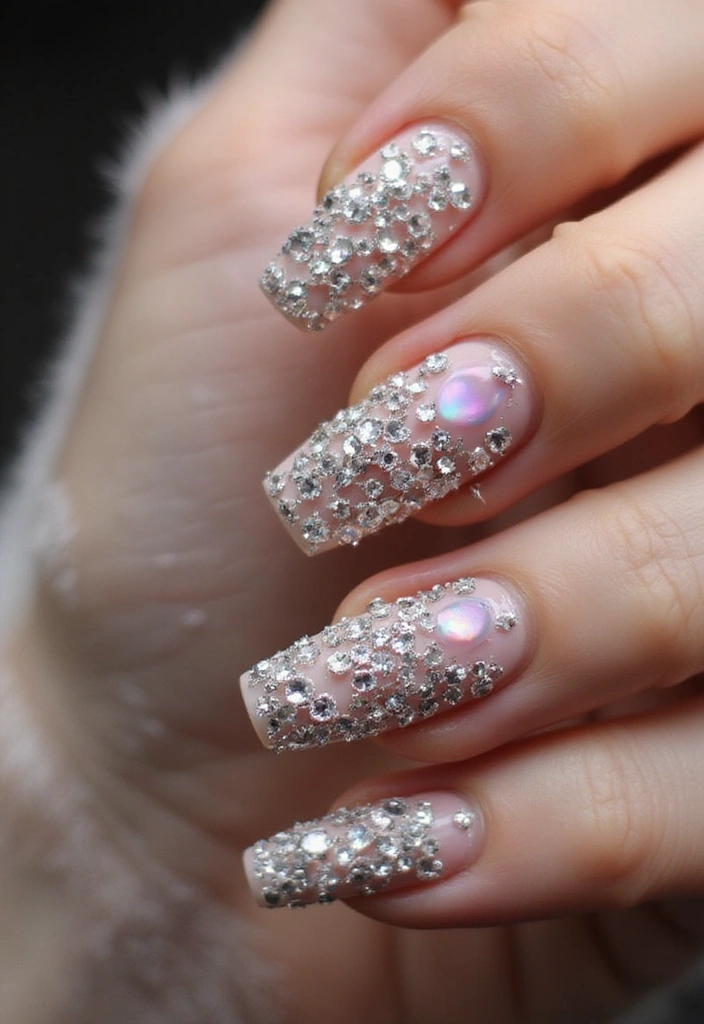
Add some sparkle to your nails with crystal accents! This design is all about adding a touch of elegance and glam to your nails. It’s perfect for special occasions or whenever you want to feel fancy.
Start with a solid base color and let it dry completely. For attaching those dazzling rhinestones, you’ll want to use a strong adhesive like Nail Rhinestone Glue for Nails. This gel ensures that your decorations stay put, allowing you to enjoy your stunning nail art without worry.
Using tweezers is essential for precise placement of the crystals. A good pair like Tweezers for Nail Art will help you position each rhinestone accurately for a polished look. Consider a minimalistic base with one or two accent nails to really let the crystals shine.
Finally, don’t forget to seal everything with a top coat to keep those gems in place. With crystal accent nails, you’ll feel like royalty every time you look at your hands!
17. Rainbow Delight
Celebrate color with rainbow nail art! This vibrant design lets you flaunt all your favorite shades and is perfect for anyone looking to brighten their day. Rainbow nails are always in trend and bring joy wherever you go!
You can go for rainbow stripes, dots, or even a gradient effect. Start with a base coat, like Sally Hansen Double Duty™, Base and Top Coat, which provides a streak-free shine and helps your colors stay vibrant. Choose your colors, and if you’re feeling adventurous, try mixing different patterns on each nail. For a wide variety of shades, consider using a gel nail polish set that includes a fantastic range of colors, including glossy and matte finishes.
To bring your design to life, a nail art brush set can be really helpful. With dotting tools and striping liners, you can create intricate patterns and details that will make your rainbow nails stand out even more.
– Use a good topcoat to keep colors from smudging.
– Don’t be afraid to mix textures, like matte and glossy finishes, for added fun.
– Pair your rainbow nails with simple outfits to let them shine!
This design is sure to spread positivity and brighten up your day!
18. Vintage Lace
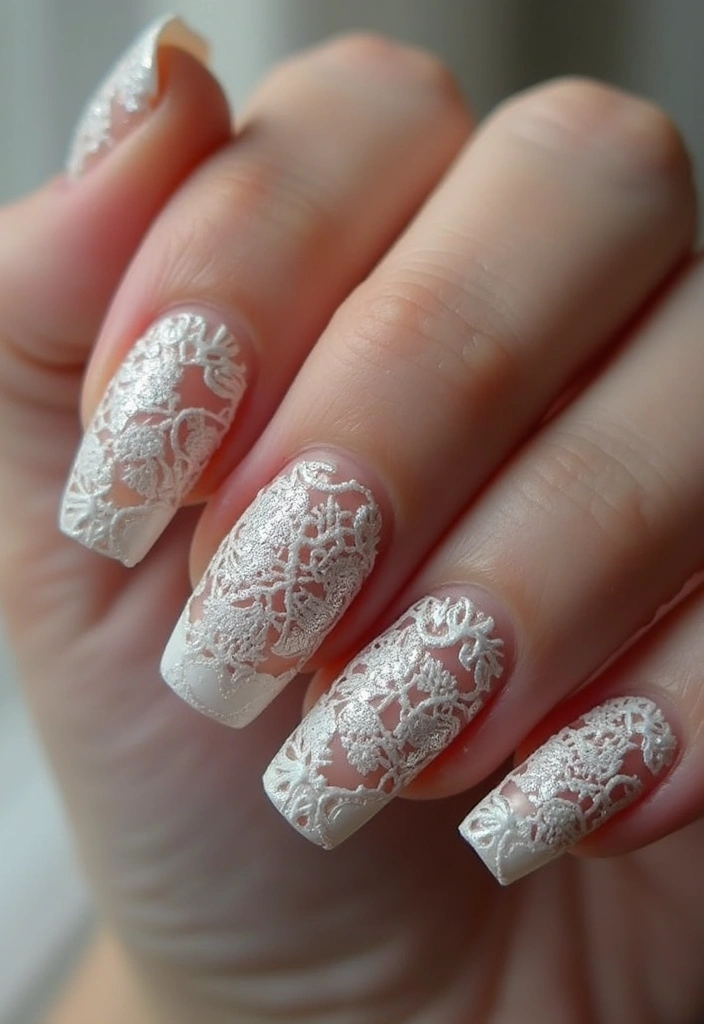
Channel a vintage vibe with lace-inspired nail art! This elegant design feels timeless and can be customized with any color. Perfect for special occasions like weddings or just when you want a touch of sophistication.
Start with a light base color, like cream or pale pink. Use a thin brush or nail art pen, like the nail art brush set, to draw intricate lace patterns. This set comes with various brushes that make it easy to create fine details. For added elegance, consider using white nail polish to mimic lace designs.
Take your time with the lace designs—patience is key! For even more flair, add small rhinestones using the rhinestones for nail art kit. The colorful and shiny rhinestones can elevate your vintage lace nails, making them truly stand out.
Finally, seal your masterpiece with a top coat like the top coat nail polish. This clear polish not only gives a beautiful shine but also protects your design, ensuring it lasts longer.
With these tools and tips, vintage lace nails are sure to impress and make you feel fancy at any event!
19. Sunflower Bliss
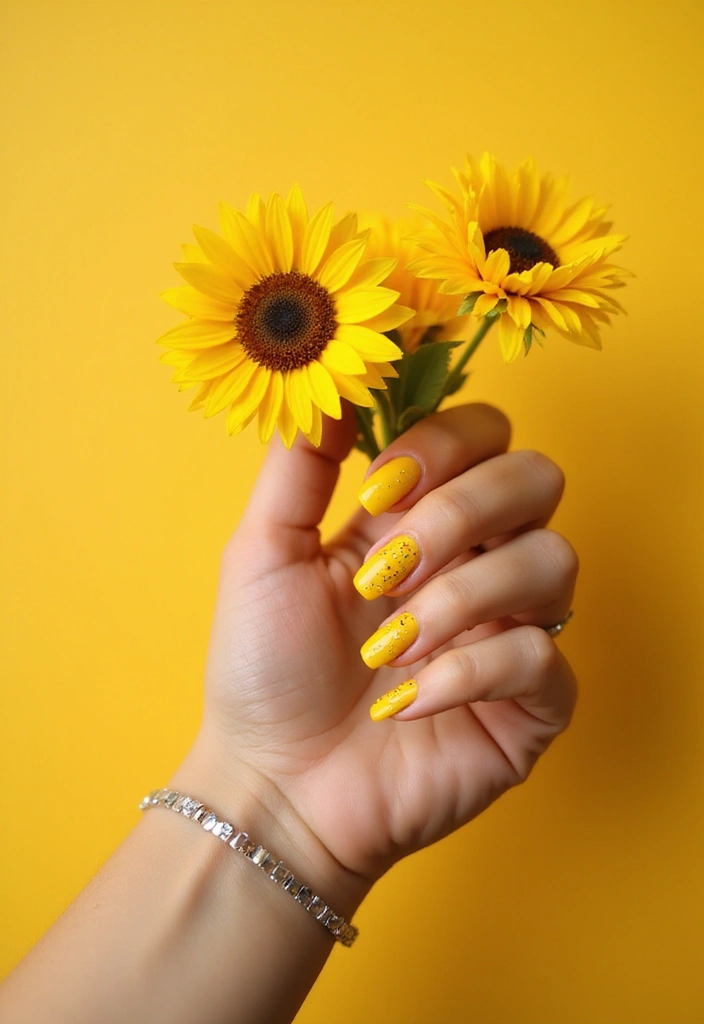
Bring a touch of sunshine to your nails with cheerful sunflower nail art! This design captures the essence of summer and can brighten even the cloudiest of days. Sunflowers are playful yet chic, making them a great choice. Start with a solid yellow base using something vibrant like Sally Hansen Insta-Dri® Nail Polish – Yellow, which provides a perfect hue to mimic the sunny petals.
Once you have your base, use a fine brush from an artdone nail art brush set to paint sunflower designs. This set includes various tools, allowing you to create intricate details such as the playful sunflower petals and the dotting for the flower’s brown centers.
For a fresh look, consider pairing your sunflower nails with a bright blue or green background. If you want to take it a step further, finish off your design with OPI matte top coat nail polish for a unique, matte finish that adds a chic touch to your art.
Don’t forget to play around with accent nails to create a fun sunflower garden! These cheerful flowers are perfect for summer outings or whenever you want to add a little happiness to your day!
20. Jewel Tones
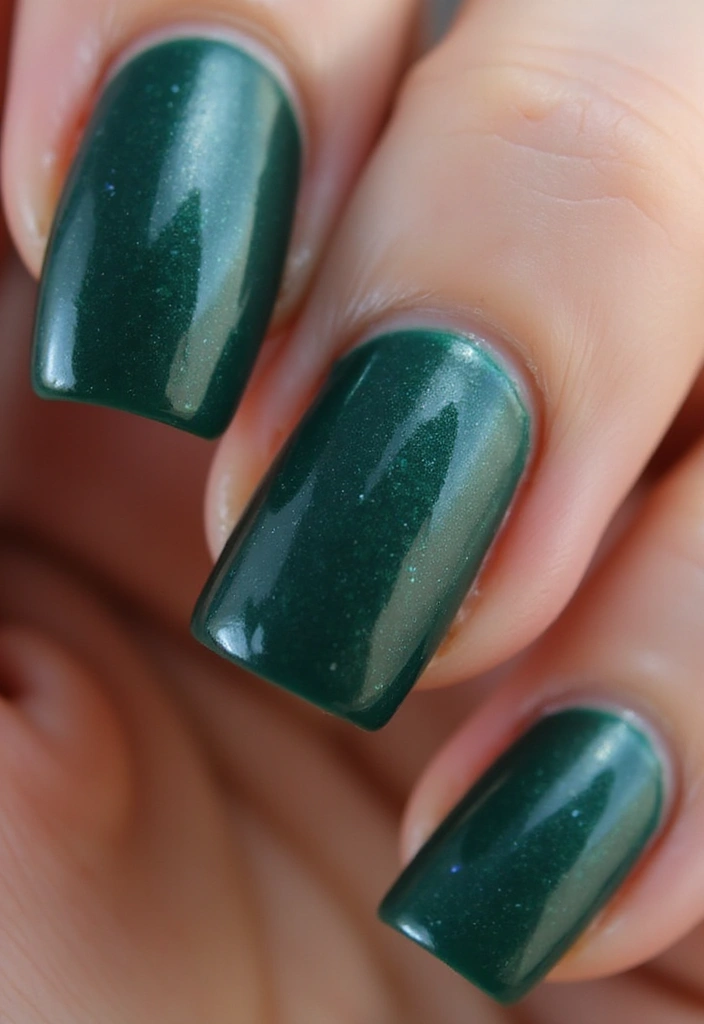
End your nail art journey with stunning jewel tones! This design channels deep, rich colors like emerald, sapphire, and ruby, giving a luxurious feel to your nails. Jewel tones are perfect for fall or winter and add a touch of elegance to any outfit.
To start, apply a base coat using a beautiful shade from the Jewel Tone Nail Polish Set. Its vibrant colors will set the foundation for your sophisticated nail art. Consider finishing your look with a matte and glossy top coat to enhance the richness of the colors and provide a professional touch.
For added flair, choose a contrasting color for an accent nail to make it stand out. If you’re feeling creative, use the nail art stamping kit to apply intricate designs with ease. These tools will help you achieve a stunning look effortlessly.
Don’t forget to seal your design with the top coat for lasting wear. Jewel tones will give your nails a classy and fashionable look that is sure to impress!
Conclusion
From playful designs to elegant styles, these 20 stunning nail art ideas are just the inspiration you need to get creative at home! Each design invites you to express yourself in vibrant ways and brings a new level of fun to your nail routine.
Whether you choose to go bold with neon ombre or keep it classic with polka dots, there’s something here for everyone. So gather your supplies, unleash your creativity, and enjoy some DIY nail art magic!
Note: We aim to provide accurate product links, but some may occasionally expire or become unavailable. If this happens, please search directly on Amazon for the product or a suitable alternative.
This post contains Amazon affiliate links, meaning I may earn a small commission if you purchase through my links, at no extra cost to you.